Let’s not beat about the bush.
Some of us are probably spending lots of time and energy teaching how to pronounce the schwa /ə/ or helping our students’ /ð/ sound just right, and while this is not a bad idea and something we obviously need to do, we might be overlooking a very subtle yet essential pronunciation distinction: the difference between the /b/ and /v/ sound.

If you are Spanish, it might be even more difficult for you as there’s no difference in the pronunciation of b and v. In Spanish, despite differentiating in writing between “vaca” and “baca”, when it comes to pronouncing them, the “v” sound is miraculously transformed into a /b/ sound.
So, it is imperative that we teach our students that the “v” sound exists much like Teruel) and here are some exercises we can do to help our students with this elusive sound.
One. The obvious. Practise the sounds in isolation.
Demonstrate how to pronounce the sounds /b/ and /v/ and ask students to imitate you. I can guarantee they will have no problem pronouncing the bilabial plosive /b/ sound but some fun and a bit of reluctance on their part are bound to happen when they attempt to pronounce the labiodental fricative /v/.
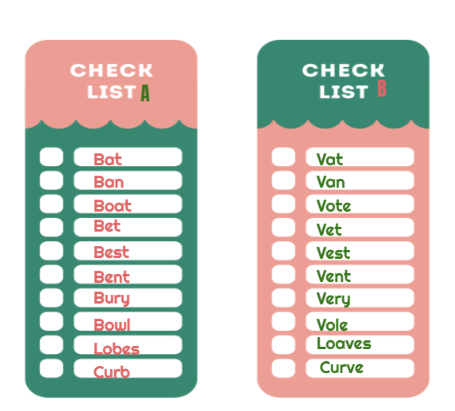
Now, give them a minimal pair they can easily recognise like “boat/vote” to do some practice and help them while they struggle with the “v” sound.
Two. Guess the words. Lady Gaga and Beyonce's video "Telephone"
Nope. We are not going to sing.
For this exercise -not necessarily done after One above-, we are going to use a short clip (4:30-4.55) from Lady Gaga and Beyonce’s video “Telephone”.
Play the video once without sound. Tell students they will need to guess Beyonce’s words. You might want to stop the video to elicit that Gaga is leaving prison. I can already warn you the first time you play it, students will look at you and tell you: “It’s impossible to guess“. Do not give up. Tell them it is a very short sentence containing “v” and “b” words. Play it a couple more times and listen to what they think Beyonce says. Play it with sound now. The important thing here is that they realize how the “v” sound is pronounced when emphasized.
Write the sentence on the board and play the video once again to pronounce along with Beyonce. If only Gaga was called Vivien, it would be perfect!!!!!!
You’ve been a very bad girl. A very very bad bad girl, Gaga!
Three. The Clever Parrot.
1. On the board, write some minimal pairs and drill pronunciation. If possible, listen to all the students individually pronouncing a set of minimal pairs.
2. Tell students you are going to point to one of the words on the board and pronounce it. They should only repeat after you only if they think the pronunciation is correct. If they think you are mispronouncing the word, i.e. pronouncing a /b/ when it should be a /v/, they should remain silent. Repeat and reinforce the correct pronunciation of all the words on the board.
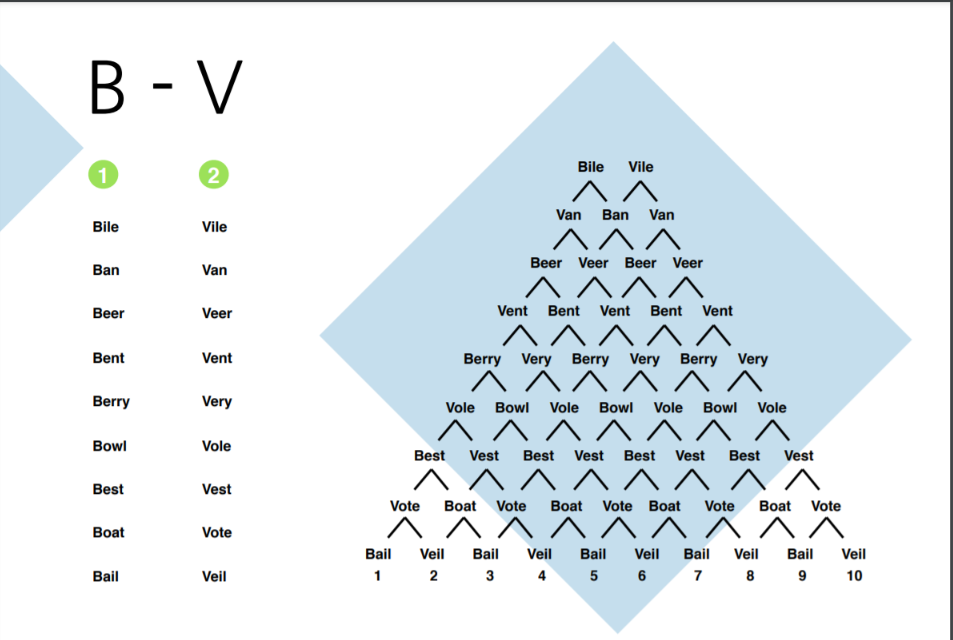
Four. On their own now. Minimal Pairs Pyramids.
Lovely exercise from www.myhappyenglish.com/. The instructions for the activity are on the second page. I have demonstrated the activity twice before asking them to pair up and do the activity. They liked it so much that most of them did it more than once. Then, ask some students to volunteer to do it for the rest of the class. A great success. They didn’t want to stop.
Five. Fun. Tongue twisters.
Tongue twisters are a fun and challenging way to encourage confidence.
Tip: the only way, if there is one, to get your tongue twisters straight is to do it very slowly at the beginning and then increase the rhythm. And to be honest, it is very hard to get it right but this is not the point, is it?
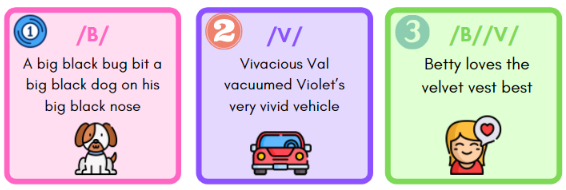
Write tongue twister 1 and tongue twister 2 on the board and ask students to practice them in pairs. After a couple of minutes, write tongue twister 3 and ask for volunteers to read it.
Six. Getting Creative.Creating your own tongue twisters.
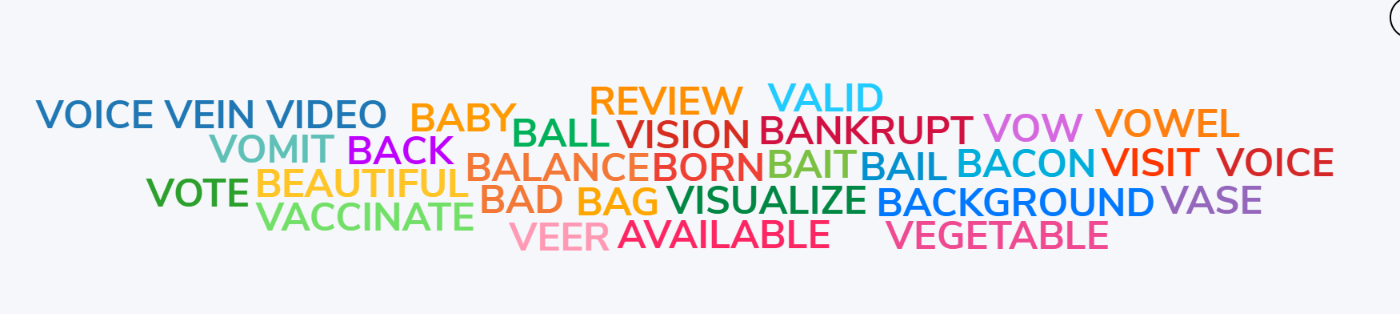
Ask students to write a list of 10 words containing either “b” or “v”. Encourage them to write nouns, verbs, adjectives, adverbs… etc. Give them about 2 minutes for this task.
Now, you can do this activity in two ways: you can write their words on the board- I find this very time-consuming- or you can ask them to use Wooclap or Mentimeter and effortlessly you will get a very nice word cloud in under 1 minute.
Once their words are displayed, ask students to write their own tongue twisters with some of the words on the word cloud. Give them 2-3 minutes and then ask them to write their sentence on a slip of paper. Collect all the slips and put them on the walls of the class; ask students to stand up and gallery walk in pairs trying to read their partner’s tongue twisters. Lots of fun guaranteed!
Ex: Bob’s beautiful vase has been visited by visitors vaccinated with available vaccines.
Seven. Speaking Activity with the same Word Cloud
Ask students to write a question to ask someone in the class using at least a word containing a “b” sound and a “v” sound. Needless to say, I encouraged them to be creative and, as long as the sentence had sense and could be answered, use as many words as possible containing /b/ or /v/.
The sentence should start with… When did you last…?
Allow 2-3 minutes for this task.
Whole class: ask a student to ask his/her question to another student. The answer should start with the same words used in the question to further practise these two sounds?
Example:
A: Peter, when did you last watch a beautiful music video? Peter: I last watched a beautiful video last month. It was Telephone by Lady Gaga and Beyonce.
I hope you have enjoyed the activities. If you have, please share this article!