Tag Archives: C1

Writing a News Article: From Theory to Engaging Practice

I know,  teaching students how to write a news article can feel a bit… uninspiring, right? Sure, we’ve all given them the “who, what, where, when, why, and how” spiel and shown a couple of examples. But then comes the big question: how do we make it exciting, hands-on, and memorable?

Picture this: your classroom is buzzing like a newsroom. There’s a clothesline of headlines strung across the room, and students get to pick one that sparks their curiosity. They, then, start writing their stories. Now, what? After that, each student’s headline goes back to the clothesline. Now, instead of just presenting their work, students pick a headline that catches their interest and become the audience for their peers’ stories. Sounds intriguing, right? If I’ve piqued your curiosity, keep on reading and below I’ll explain how this clothesline activity can transform the typical writing exercise into a dynamic and memorable learning experience!

Before we dive in, just a quick reminder: this is Part 3 of our series leading up to writing a complete news story. If you missed Parts 1 and 2, be sure to check them out to catch up on the grammar and writing activities that set the stage for this exciting final step

Step 1: The Theory; a.k.a the uninspiring part.

PDF

In the handout,

  • I’ll guide my students through the step-by-step process of writing a news article
  •  Provide two sample activities to get started. It begins like this

Step-by-Step Guide to Writing a Newspaper Article

1.Outline the Article Structure

Draft an outline based on the inverted pyramid structure, where the most critical information comes first. This typically includes:

    • Headline: A catchy title summarizing the main point.
    • Byline: The author’s name and possibly their role.
    • Lead Paragraph: The introduction that covers essential details.
    • Body paragraphs: Provide details in descending order of importance
    • Conclusion: wrap up the story

2. Focusing on the Headline Characteristics

  • Always be  concise and direct
  • Typically use: …

(refer to the PDF)

Step 2: Creating the Prompts for the Fake News Stories. The Beauty of Belnding Old and New

Back in the day, crafting 15 fake news headlines for a lesson? Absolutely not. Too much time, too much effort! But now? With AI, it’s  so easy!!!.

I hopped onto Canva and  wrote the prompt below—and, in seconds, I had them all. Then, I printed them (yep, old-school paper!), and bam—ready for class.

I want to give my C1 English students news headlines and some details of the story. Students will need to write the news story and be creative. Can you provide me with 15 news headlines and a  couple of details about the story using bullet points? They will also be required to use reported speech  so some direct quotes from people involved in the story are welcome. Include some fun headlines about EOI Avilés, a state language school in Asturias.

Link

Newspaper headlines de cristina.cabal

Step 3. Fake News on a Clotheslines

Next, I hung the cards  on some cute clothesline.

Students stood up, browsed the “news,” and picked their favorite headline -the stories included some hilarious takes about my school, EOI Avilés (those got the biggest laughs).-Then, they got to work writing their stories. I gave them 25 minutes to write their stories.  And just like that, you can turn a writing activity into something dynamic and interactive.

While students wrote their fake news stories, I got to work correcting their most important mistakes. It took longer than expected, so I handed out an extra exercise to keep them busy while I finished.


Final Step: Headline Hunt and Story Swap

For the final step, I divided the class into journalists and audience members. The journalists hung their prompts for headlines on the clothesline, giving a glimpse of what their stories were about. I asked the audience members to stand up, browse the prompts, and choose the one they were most curious to hear. OOnce selected, the audience members read their chosen headlines aloud, and the journalists who had written the corresponding stories raised their hands. They then paired up, with the journalists sharing their stories directly with the audience members. While I didn’t ask them to memorize their stories, they were encouraged to speak naturally and avoid reading directly from their texts, making their storytelling more engaging and dynamic.

They, then, changed roles.

FINAL THOUGHTS

This whole process got me thinking about how magical it is to mix traditional teaching methodologies with the innovative power of AI. AI takes care of the boring work—brainstorming, designing, even personalizing content—while I get to focus on the hands-on, human side of teaching. It’s like having a super-efficient assistant who works behind the scenes while I take center stage in the classroom.

And honestly, I think that’s the future of education. It’s not about choosing between AI and traditional methods. It’s about finding that sweet spot where the two complement each other. AI gives us tools to do the heavy lifting, but we still get to add that personal, human touch.

Follow us on

Reporting Verbs in Action and some Engaging Writing Practice

Looking for some ideas to bring some excitement into your classroom while teaching grammar and writing skills? Well, you’ve come to the right place! This blog is the second instalment in a three-part series where I design a complete lesson for C1 students, covering vocabulary, pronunciation, speaking, grammar, and writing, all centered around the theme of news and the media.

  • Part 1: from headlines to conversations: Building Media Vocabulary
  • Part 2: this is the one you are reading right now
  • Part 3: Writing a News Article: From Theory to Engaging Practice

This post is all about reporting verbs. But why focus on this bit of grammar when discussing the news and media? Typically, when you interview someone and then need to write a news article, you’ll likely want to sum up what they said. That’s where reporting verbs come in handy! So, here we go!

(Would you rather listen to the podcast where the content of this article is discussed? )

Warm.-up: Introducing Reporting Verbs
STEP 1. The Grammar.

First, write two sentences on the board and show them how a B2 student would rewrite them and how a C1 student would do it using a reporting verb.

He said:” I didn’t do it”

  • He said he hadn’t done it (B2)
  • He denied doing it (C1)

He said: “I won’t do your homework”

  • He said he wouldn’t do my homework (B2)
  • He refused to do my homework (C1)
STEP 2:  Half a Crossword

There are many reporting verbs, but I don’t want to overwhelm my students and tell them to study the grammar for the hundred verbs the book offers, so I am going to select a few and stick to them throughout the whole lesson. These are the ones they will have to study.

To introduce the reporting verbs I wanted them to study, I have used this tool that creates half crosswords. It gives you two versions of the crossword puzzle: Student A and Student B. Each version has only half the answers filled in. Students take turns describing their reporting verbs without directly giving the answer. Once the puzzles are filled, students compare answers to ensure everything matches.

NOTE: when you print the crossword, for some reason the numbers disappear. It was not a problem in my class, they just pointed to the blank they wanted to fill.

Manipulative. Reporting Verbs Matching Activity. PDF
Step 1. Matching

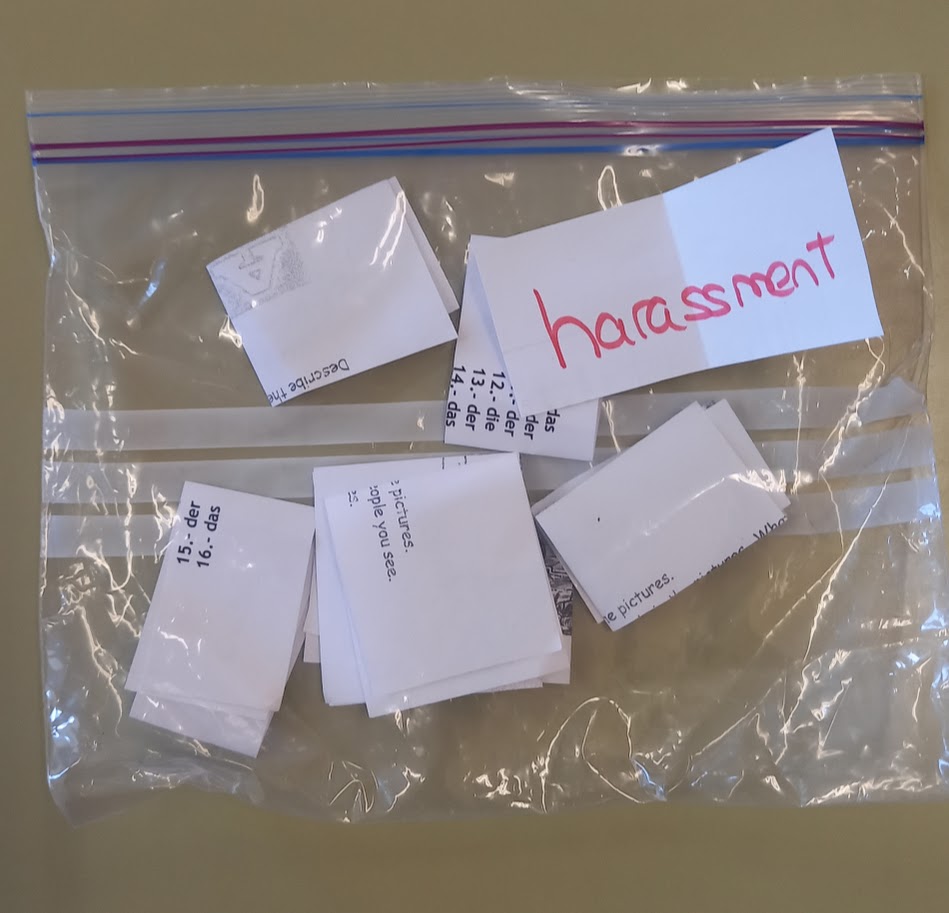
Ah, the never-failing traditional methods! Here’s a classic yet super effective activity to get students comfortable with reported speech. Give each pair of students a set of pre-prepared sentences and reporting verbs—yes, this means some cutting and prepping, but hey, these sets can be reused countless times! Their task? To identify and match each sentence with the correct reporting verb. Then, check the matches one by one as a class

Step 2:  Reporting the sentences

For each pair, ask the students to report the sentence aloud using the correct reporting verb. Write the correct reported sentence on the board and focus on the grammar.

Writing Challenge 
STEP 1. Writing

Time to recycle spare photocopies!  Cut them into strips of paper large enough to write a long sentence on.

  • Ask students to pair up and give each pair 3 or 4 strips of paper.
  • Display the interactive activity below and ask someone in the class to choose a box
  • In their pairs, they will have about 2 minutes to come up with their best sentence using the reporting verb on display and, in the case of my students, trying to use vocabulary related to the news and the media: this is the lesson we are studying.
  • In the meantime, I will write the reporting verb on display on a post-it note and post it on a visible part of our classroom wall.
  • Once they have finished writing their “advanced” sentence, we will put them up on the wall, surrounding the verb. You can use Sellotape or Blue-tack for this.
  • Open a new box to reveal a new reporting verb and do it all over again. I have done this  5 or  6 times.
    What is your role as a teacher?  Yes, you need to be working, too. Once they have placed their sentences on the walls, you will need to correct their mistakes.
Step 2 Voting
Once the sentences have been written and mistakes have been corrected, instruct students to stand up in pairs and read all the sentences surrounding the nouns. They will now need to vote for the sentence they think is the best in terms of showing a more advanced level, regardless of the mistakes they might have made. To mark the sentence they like best, they will just have to put a tick on the strip of paper containing the sentence.
This has two aims:
1. To help students identify their own and their peers’ mistakes, which is a valuable learning experience.
2. By voting on the best sentence, students come to understand their own ability to distinguish between writing that meets the C1 level and writing that falls short.


And finally, the photocopy

PDF

Follow us on

Lesson Plan: Going Vegan?

For over 30 years, I’ve been a proud pescatarian—a semi-vegetarian, if you will—happily skipping steak. Let me tell you, being “the one who doesn’t eat meat” in a region, Asturias,  famous for its chuletones and fabada can make for some hilarious and eyebrow-raising moments: from explaining my choices at barbecues to finding the right food for me in a menu full of meat choices, I’ve collected plenty of anecdotes along the way.

So, in this lesson aimed at B2 + students,  we’re going to explore the fascinating world of vegetarianism—a topic that sparks some seriously interesting conversations.

Ingredients of this lesson plan.

  • Warm-up: speaking and a fun video
  • Introducing Vocabulary with a home-made IAnized 🙄 video: Vegan vs Vegetarian
  • Vocabulary
  • Speaking: two corners
  • Scattergorix Game
WARM-UP: Speaking and one of my Favourite Videos

To kick things off, I’ve got a video I’ve been using for years to introduce this lesson. Now, I’ll admit that the quality is terrible. It’s grainy but it’s absolutely hilarious, and I just can’t bring myself to part with it. Before we jump into it, though, let’s set the scene with a couple of thought-provoking questions:

  • Have you ever gone on a date with someone who was vegan? How did it influence your choice of restaurant or food?
  • Do you think food choices (like being vegan) should be a factor when choosing a partner? Why or why not?

LISTENING:Note-taking: Vegan vs Vegetarian

Time to clear up the terms vegan vs. vegetarian, often confused! I’ve made a quick video using AI magic to explain the basics.

Students watch the video and jot down the key differences. In retelling the main differences, make a point of writing key vocabulary on the board.

 Differences between de cristina.cabal

Vocabulary

Do we need a vocabulary exercise? Absolutely! The more words we know, the more we can express ourselves—plain and simple.


Speaking Practice

Let’s get moving with an expressing opinions activity! It’s all about taking a stand—literally.

Step 1. I’ve kept it simple—just grabbed three plain sheets of paper, and wrote I agree, I disagree, and I can’t decide, and stuck them in the corners with blue tack.

  1. I agree
  2. I disagree
  3. I can’t decide (optional, if you have a larger group).

Step 2. I display the first statement, Being a vegetarian is the best choice for both personal health and the planet . Once students decide whether they agree or disagree with the statement, and before they stand up, I offer some guidance by suggesting ideas they can use to explain their position on the statement.

So, if they AGREE, they can use these reasons;

  • Reduces risk of chronic diseases (heart disease, diabetes)
  • High in nutrients like fibre, antioxidants, and vitamins
  • Avoids animal cruelty in factory farming
  • Lower carbon footprint and reduced resource use (water, land)
  • Helps combat deforestation and biodiversity loss

If they DISAGREE, they can use these

  • Risk of B12, iron, and protein deficiencies without careful planning
  • Limited food options in some cultures or regions
  • Costly and hard to access plant-based substitutes
  • Large-scale plant production can also lead to deforestation and water use

Step 3.  they are ready now.  Sudents move to their corner and discuss with like-minded peers for about 5 minutes.

Step 4. After about 5 minutes, they’ll pair up with someone from a different corner and try to change their mind—debate time!

For the next statements, they’ll have a moment to prepare their reasons before standing up and choosing their corner.

Going vegan? – Presentación de cristina.cabal

Game: Scattergorix

After hard work comes the reward—this time in the form of a game! Have you ever played Scattergorix? In this round, the list of categories is all about food. Hey!!! And yes, I got a little help from ChatGPT. Sometimes, it’s not so easy to come up with something for every category.

These are the rules of the game and below, the home-made game I created for my students.

scattergorix de cristina.cabal


Food Scattergorix de cristina.cabal


Follow us on

Engaging Students in Job Application Writing: from AI Tools to Traditional Clotheslines

If you’re anything like me, you probably feel the time crunch every time you try to squeeze in a longish writing task during a lesson. Let’s be honest, finding time for students to practice writing in class—beyond those quick sentences or short paragraphs—is tough!
I mean, there’s so much to cover!!! Besides, the second I announce a lengthy writing activity, I can see how the general mood changes, even mine.I know it is going to slow the pace, break the  flow of our lesson and a long etc , but… we know deep down that this activity is important.

The truth is I’d love to offload some of this writing practice as homework. I mean, wouldn’t it be easier to ask students to draft an essay at home and then review it in class? Sure… in an ideal world. But we’re not living in that world anymore, are we?  ChatGPT or any of its friends sure have something to do here.  I know that if I want to ensure my students are actually developing their writing skills, it has to be done in the classroom.

PREP

Before we get into the writing task itself, I dedicated several lessons to exploring the topic of work—covering vocabulary, discussing job roles, and what makes a strong job application. As you can probably guess, being a bit of an AI enthusiast, I have used different  AI tools to make this lesson happen. Here’s the step-by-step:

Step 1: Create a Presentation with AI Tools to Introduce the Task
  •  I relied on Perplexity for this because it not only generated a well-structured overview but also provided credible sources. This was key for a topic like job applications, where students need to trust the information.
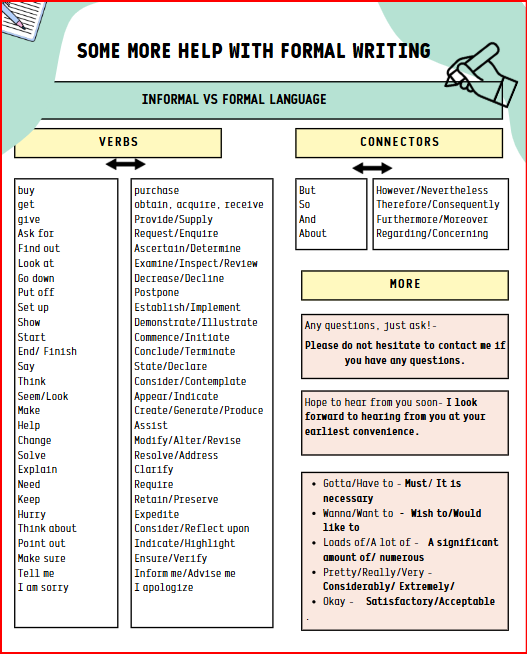
  • I took the generated text from Perplexity and pasted it into Brisk Teaching, which automagically turned it into a Google Slides presentation, complete with relevant images. Now, it wasn’t perfect—just a draft—but it saved me a ton of time! I was able to quickly refine it by adding sections on indirect questions and formal connectors, tailoring it to fit my lesson objectives.

Ready-to-Use Materials: presentation

Step 2: Prepare Sample Sentences and Emails
  • I used Perplexity again to create sample sentences for the opening of the email, as well as two complete sample emails.
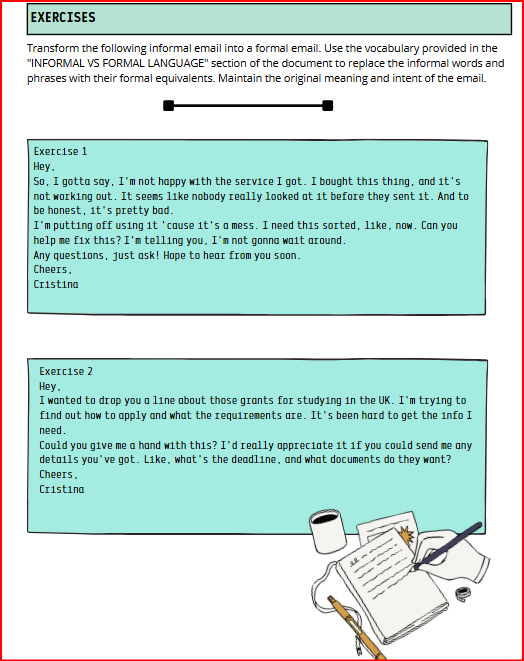
  • I printed these out as handouts and gave students 10 minutes to read through them. This step was crucial for modeling good examples and helping students see the structure of a formal email.

Ready-to-Use Materials: handout ,

Step 3: Generate Realistic Job Offers

Excited about writing? Let’s be honest: getting students excited about writing a job application can be really difficult. So, I decided to make it more engaging by giving them realistic job offers to choose from—just like they might find on LinkedIn. Did I create these from scratch? Nope! I used Canva’s AI tool to generate slides filled with job postings. It was fast and looked super professional.

I printed the job offers and hung them up on clotheslines in the classroom, creating a job fair atmosphere. I asked students to head over to one of the clotheslines and pick out the job they’d like to apply for. You can print them here


LinkedIn Job Listings de cristina.cabal

Step 4: Time to Write!

With their chosen job offer in hand, it was time to write the email. I set a timer and gave students 20 minutes to complete their task. I encouraged them to use the sample sentences and email structure from the handout as a guide. This focused writing time was key—it kept everyone on task and ensured that the writing was happening in class, where I could support them.

Step 5: Showcase and Feedback

Once the emails were written, we moved into a gallery walk activity. Students pasted their job offer and application email on the walls. They then circulated around the room, reading each other’s work. This was a great way to share ideas and see different approaches.
While they were reading, I walked around and provided feedback, focusing on the most noticeable errors. It was an efficient way to address common mistakes and give students a chance to learn from each other.

That’s all! I hope your students enjoy this activity as much as mine did!  Give it a go, and let me know how it works for you!

Prepping Students for Persuasive Role-Play: Remote Work vs. Office, and Reduced Working Week Debate

If you’re like me, you’ve probably used role-play countless times to get students talking and thinking on their feet. But lately, I’ve found myself wanting to take it up a notch—giving students real-world topics that they’ll actually encounter outside the classroom. So, I created two role-play scenarios that bring today’s workplace debates right to our classroom: remote work vs. in-office and the reduced working week. These topics got my students diving into different perspectives and working hard to persuade each other.

ROLE-PLAY 1: Remote Work vs. In-Office Work Debate

MY PREP APPROACH

  1. Visuals.First things first—I kicked off the role-play by setting the scene with a quick, visual presentation. There’s nothing like a few eye-catching slides to spark interest. Don’t you agree?

Role-play: working remote vs in person de cristina.cabal

2. The Context. (also in the presentation above)

You and your next-door neighbor, who is also your best friend, have been working at the same company for five years. You carpool and split the costs, which has been convenient, especially with the high price of petrol.

Recently, the company has given employees the option to work from home, only requiring them to come into the office once a month.

3. Help is coming: Ideas. Here’s the PDF .I gave my students a handout laying out key points for each side. Students choose which position they want to argue, but I make sure we have an even split between pro-remote and pro-office advocates.. I encourage them to add their own points to this list to make their argument more personal and compelling.

CHOOSING ROLES AND PREPARING ARGUMENTS

Once they know their stance, students jot down three solid arguments that support their position

ROLE-PLAY AND PERSUASION TIME

Each student has 5 minutes to make their case, present their points, and then attempt to sway the other person.


ROLE-PLAY 2: The Reduced Working Week

This second role-play taps into another current trend: the reduced workweek. I wanted students to explore this not only from a productivity standpoint but also from a cultural and economic perspective. The debate centers around proposals to reduce the standard working week in Spain, traditionally from 40 hours to potentially 37.5 or even 32 hours, without reducing wages.

The procedure is just the same as above

MY PREP APPROACH

  1. Visuals.

    Role-play: The reduced working week de cristina.cabal

  2. Context: (also in the slides above)

It’s lunch break at a mid-sized company in Madrid. You and your colleague are discussing the news about possible changes to the work week while having coffee in the break room.

        3. Some Extra Help. Text? No, this time help comes in he form of a video

So this one  comes from a short, engaging video made on InVideo, an AI tool that helps you create quick, professional-looking videos. In this case, I found a piece of news in ElPais in English and just pasted it on Invideo. This tool is such a gem because I can tailor the content exactly to what my students need. It’s also great for visual learners who absorb info faster through media.

CHOOSING ROLES AND PREPARING ARGUMENTS

Students watch the video and then pick a side. I ask them to prepare 3-5 key talking points. Here’s where I get them to think critically: How could a shorter workweek boost mental health? What about the potential strain on business operations?

I challenge them to think beyond themselves and consider how this change might impact families, communities, and industries at large.

ROLE-PLAY AND PERSUASION TIME

Each student makes their initial case, and then they respond to counterarguments. It’s a great way for them to see how they need to think on their feet!

EXTRA SPEAKING PRACTICE

To wrap up the class on a high note, a whole-class speaking activity can be a great way to keep the conversation going and let everyone share their thoughts. A few open-ended questions about work culture can get everyone talking and reflecting on what they’ve learned.

Speaking de cristina.cabal