Tag Archives: onlinetools

3 Useful YouTube Tricks, a Video Listening+Speaking Activity. A Flipgrid Proposal.

Unit 1 of my textbook is dedicated to questions. All sorts of questions: indirect, with prepositions at the end, negative interrogative questions, echo questions, question tags… etc. Yeah, I know. Lots of teaching here. On the bright side, teaching questions offers such a variety of activities you can do with your students that sometimes it is hard to find the time to do all the amazing stuff published all around the web.


This year, for my first lessons dealing with questions, I have decided to choose one of the hundreds of interviews to celebrities available online. It is still the beginning of the course and I wanted something quick and not too difficult to understand. And, I found this interview with Selena Gomez who, to be honest with you, I didn’t know much about just perfect as it is all about questions and, more specifically, get-to-know-you questions.
Anyway, I wanted a short simple listening exercise and I wanted to post it on the blog so that my students could do it again at home. To do the whole activity, I needed to solve a few technical issues regarding YouTube which I’ll detail below, in case you find them helpful.

YOUTUBE VIDEOS: SOME TRICKS YOU MIGHT WANT TO KNOW
  • Sharing a youtube video with a specific start time

You probably know how to share a video starting at a specific point. You don’t? Well, that’ s pretty easy to do.

  • Sharing a youtube video with a specific start and end time

That’s a bit more complicated. Keywords “ a bit”. The first thing you need to know is the specific time you want your video to start and to finish. For example, if you need your video to run from 1:20 to 2:15, you need to convert it into seconds.

1:20 -1 minute= 60 seconds+ 20= 80 seconds (start time)

2:15- 2 minutes= 120 seconds+15 = 135 seconds (finish time)

Now, grab the embed code for the video. In my case, it was

<iframe width=”560″ height=”315″ src=”https://www.youtube.com/embed/_GFkHA5EZdE?start=1″ frameborder=”0″ allow=”autoplay; encrypted-media” allowfullscreen></iframe>

Change the start time and instead of 1, write 80 and then add &amp;end=135

The resulting embed code is

<iframe width=”560″ height=”315″ src=”https://www.youtube.com/embed/_GFkHA5EZdE?start=80&amp;end=135 ” frameborder=”0″ allow=”autoplay; encrypted-media” allowfullscreen></iframe>

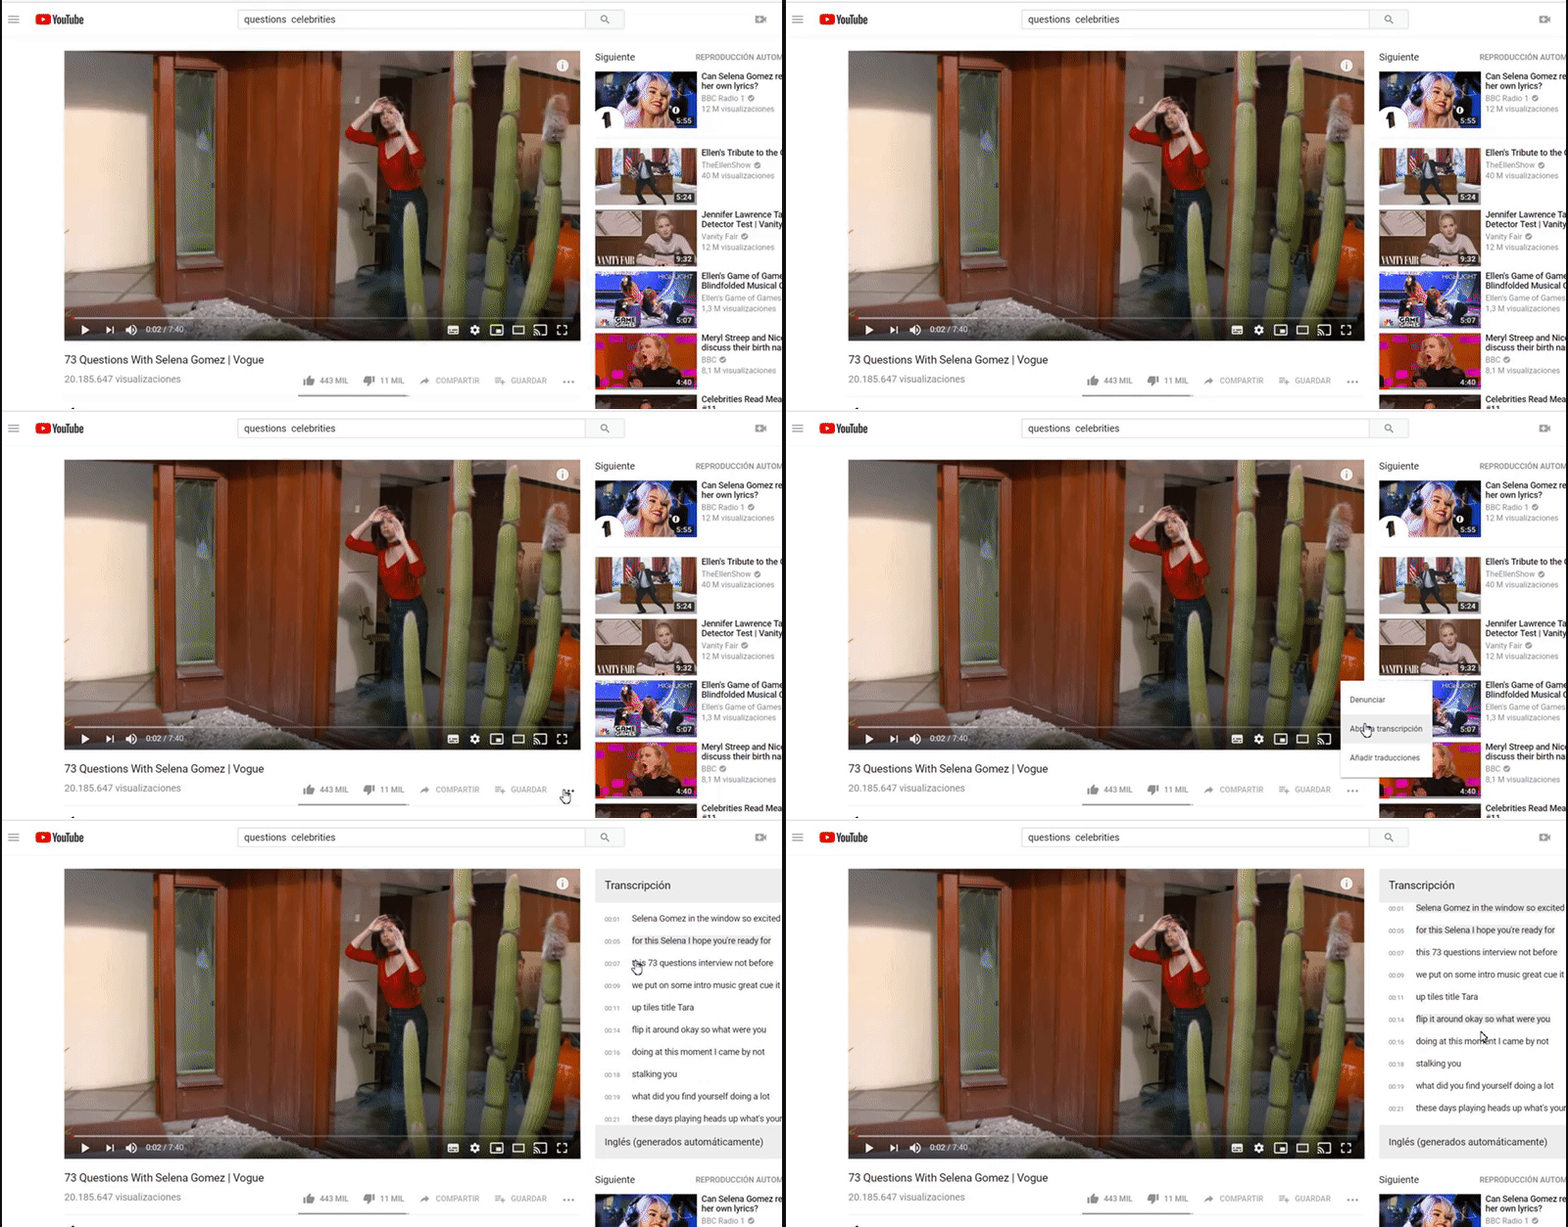
  • Getting the transcript. Call me lazy but if technology can save me some time….

You can easily get the transcript from a youtube video clicking on the three dots next to the save button.

VIDEO-BASED LISTENING ACTIVITY:  18/73 QUESTIONS WITH SELENA GOMEZ

(Follow -up activity:  I am looking for  one or two EOI teachers, teaching the B2.2 level, to work with me on a  simple single get-to-know-you project using the free online tool Flipgrid. If anybody is interested, please send me an email)

  • Level: B2
  • Skills: listening and speaking

As I have mentioned above, I wanted a short listening activity which could serve as a springboard for a speaking get-to-know-you activity among my students.

LISTENING COMPREHENSION

Procedure:

  • Play the video once and ask students to just listen. At the end of the video (the video is set to stop at 2:08) students will probably complain that it goes too fast. My advice? Smile and say “You can do it! “, because they actually can.
  • Give them the handout with the questions and play the video twice more.
  • Before you play it a third time, ask students to share their answers in pairs and, needless to say,  in English.
  • Play the video once more, pausing after each answer. Ask students to provide the answer and repeat procedure for question 2.

Here are the questions. To get the answers, just display the transcript as indicated above.

SPEAKING  ACTIVITY:  15 minutes
  • Play the video again, this time and depending on the number of students, play a couple more minutes or if necessary the whole video.
  • Tell students, they will need to listen very attentively to the questions asked to Selena and choose one they would like to ask their classmates.
  • Ask them to write it down and check with you that it’s Ok.  When they are ready, ask them to stand up in a mingling activity and interview as many classmates as possible.

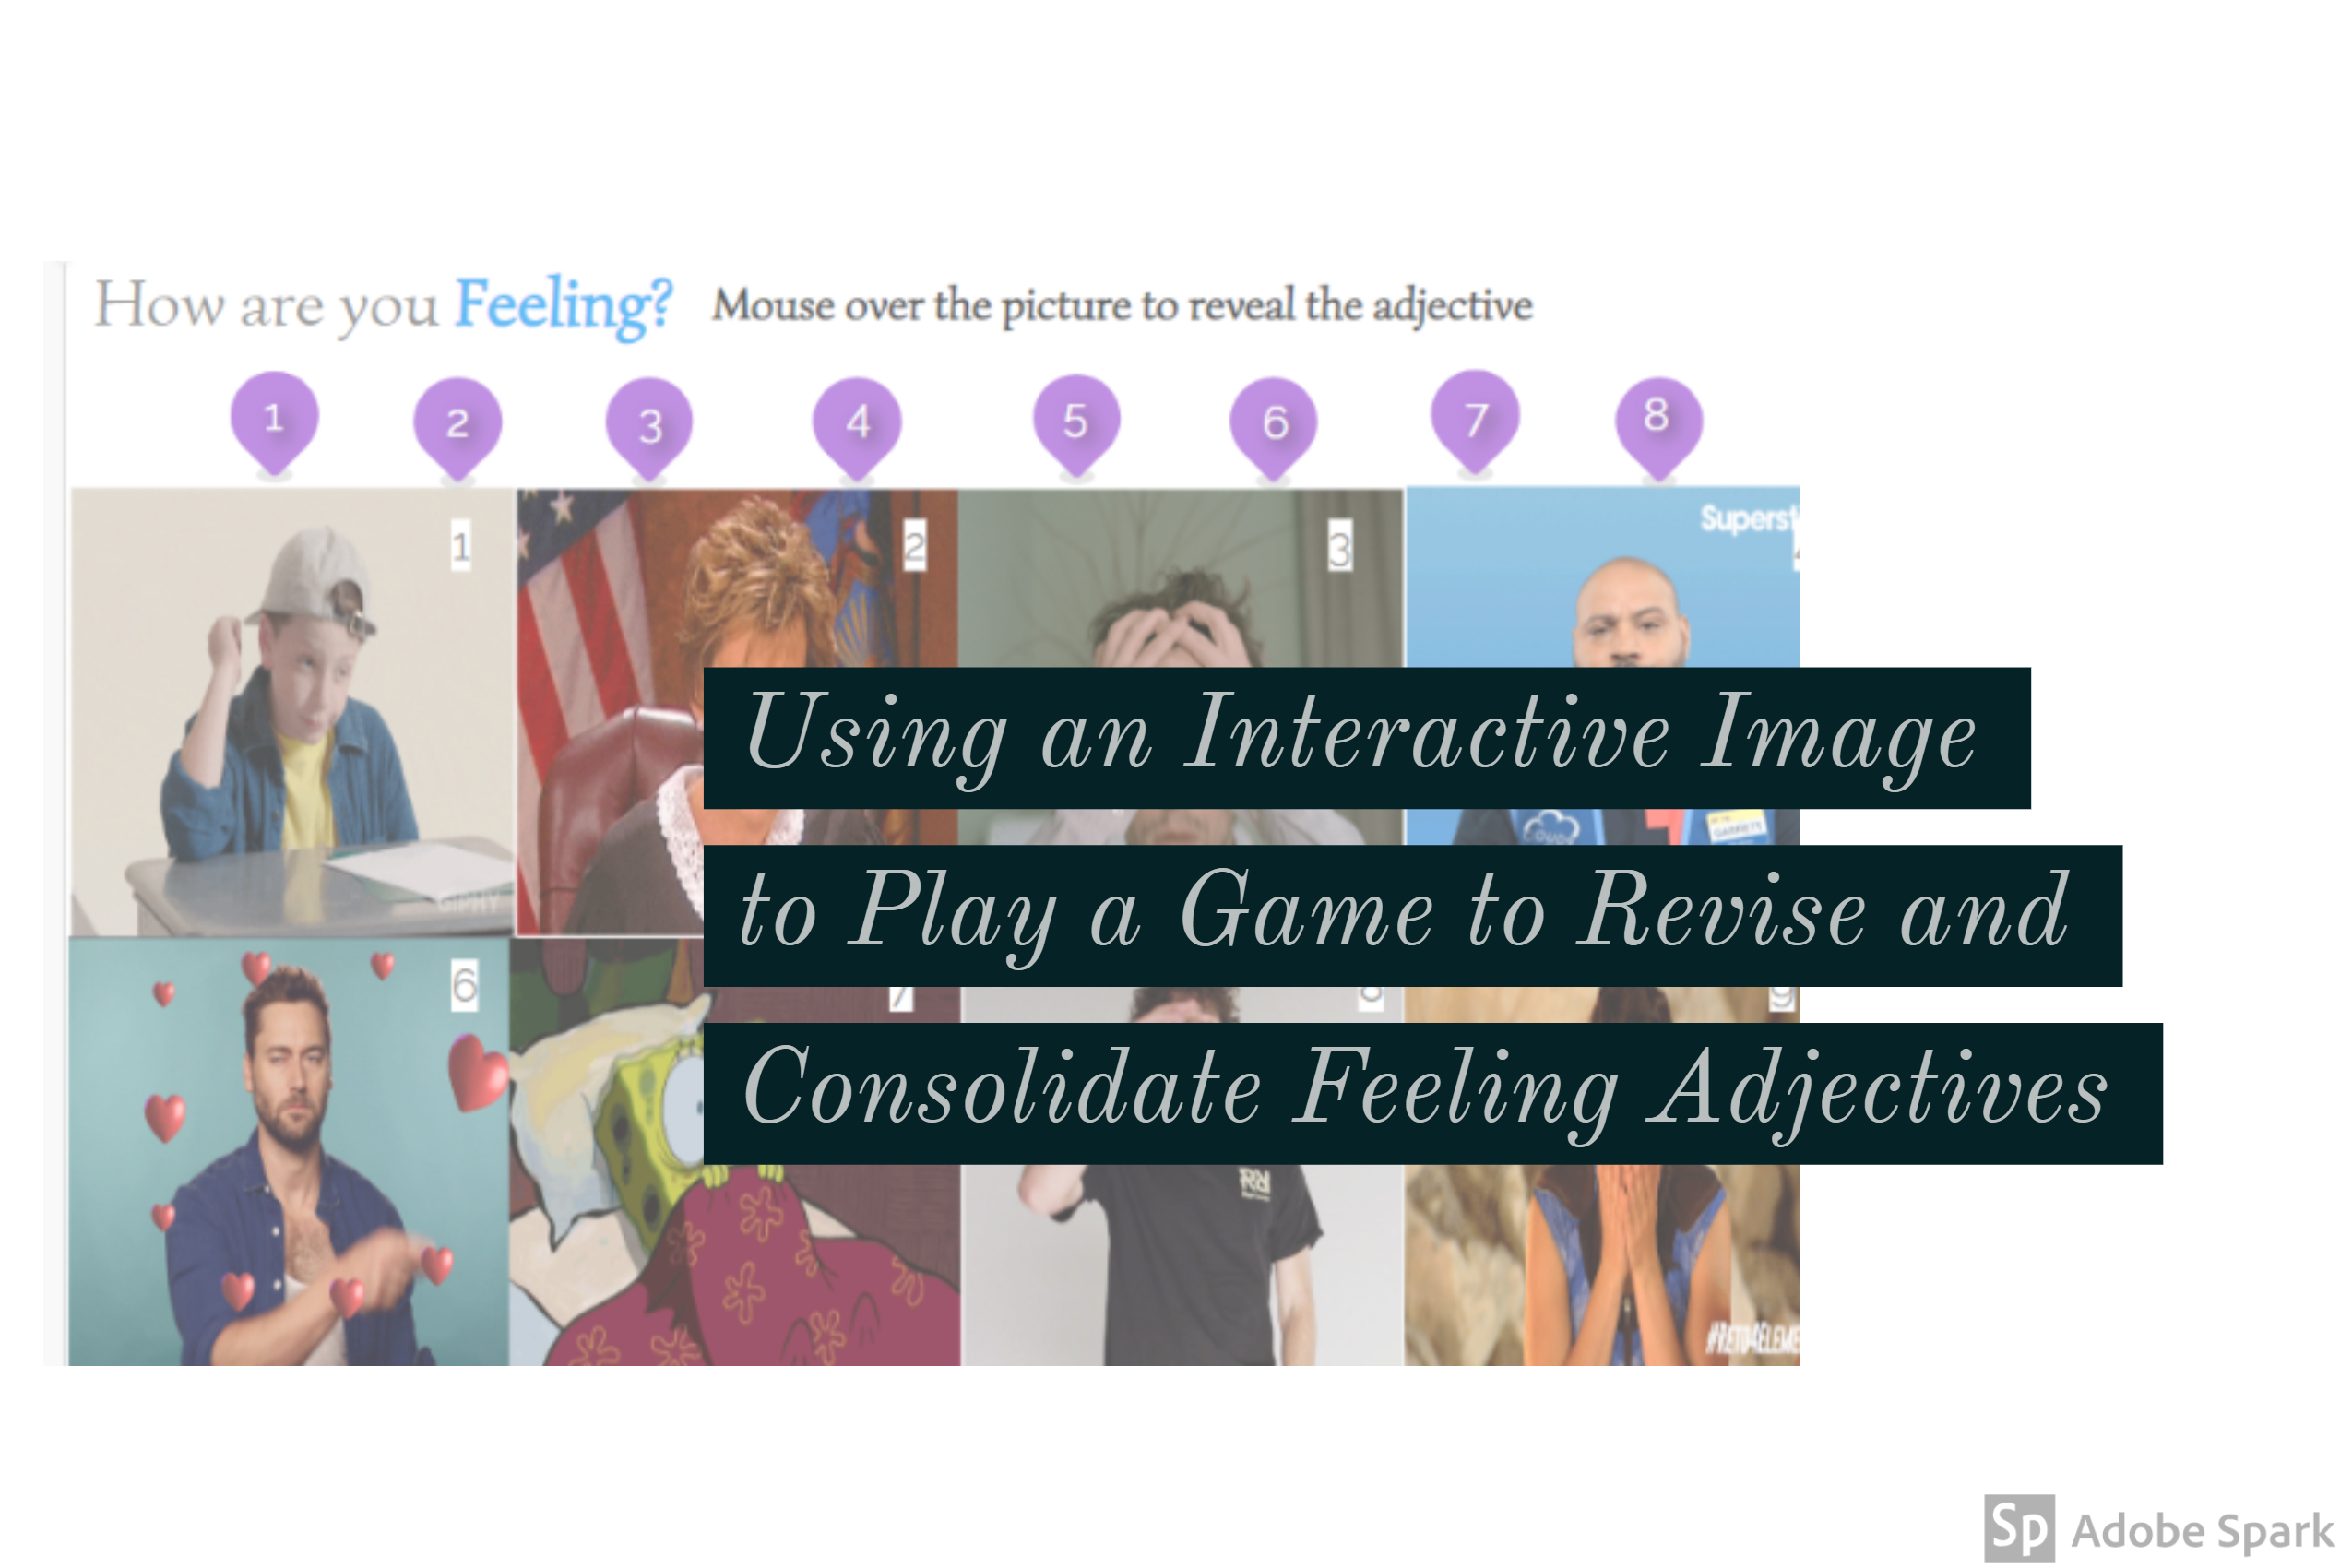
Using an Interactive Image to Play a Game to Revise and Consolidate Feeling Adjectives

Autumn is probably my favourite season. Autumn is the season of birthdays in my family. Also, it’s not too hot or too cold. This year, this is especially important for me as I have been assigned a small class facing south and I know, come May,  I’ll be sweating up a storm. So, for the time being, let’s enjoy beautiful autumn.

This year I am teaching 2-hour lessons so, more than ever, I feel the necessity to design activities that might change the pace of the lessons and keep my students from dozing off in my classes. The activity below is aimed at that. Still, I need to be completely honest here. I have not started teaching proper lessons so this activity has not been tested yet.  I’ll let you know how it goes and if I hear any snores or see people yawning, then I would know it has been a complete failure.


Aim:

  • to revise and consolidate adjectives related to feelings
  • to use these adjectives in a speaking activity.

Tool: Genial.ly. For this activity, we will use the grid below with gifs representing different feelings. This is an interactive image created with an awesome tool called Genial.ly, which I am proud to say is a Spanish start-up used all around the world. Genial.ly lets you create engaging interactive visual content and for this activity, I have used the “Hide” effect so if you mouse over the gif, you’ll be able to see the adjective. Also, the questions for discussion will be displayed when you click on the numbers.

(click on the arrows to enlarge the image)

Version 1


Version 2


Procedure

For each of the squares in the grid, do part 1 and then part 2.

FIRST PART: WORKING ON VOCABULARY

  • Ask students to work in pairs. Student A will be playing “against” Student B.
  • Ask student As to choose a number from the Feelings Grid below. You can ask all the As to agree on a number, but in some classes, it might prove a difficult task to reach quick consensus, so you might want to just choose a random student A to decide on a number.
  • Once they have chosen a number, both student A and B will write the adjective they think is hidden behind the gif representing the feeling. Allow 30 seconds for this step. Let student A and B compare their answers and then mouse over the gif to display the hidden adjective.
  • If they have guessed the adjective, they score 2 points. If the adjective they have written is a synonym, they score 1 point. Ask students to keep score of the points they get.
  • On the board, you might want to write the target adjective and the synonyms they come up with. Drill pronunciation of the adjective and all its synonyms.

For example, if they choose Gif  9 and the adjective is worried you might want to accept “anxious, troubled or concerned” as synonyms. You can use a synonym dictionary, like this one https://www.thesaurus.com/. There is no shame in this. 😉

SECOND PART: WORKING ON SPEAKING

  • Click on the number, in this case, number 9 and a question will be displayed. Ask students in pairs to discuss the question. Set about 4 minutes per question. Walk around. Monitor and help. Avoid overcorrecting.

Now, B’s choose a new number from the Feelings Grid.

Note: if you haven’t taught any of the adjectives, you can still use the activity.  Change the rules of the game and instead of scoring two points if they guessed the adjective, you might want to give them the points if they come up with a synonym even though it’s not exactly the one hidden behind the gif.

To be on the safe side, and to avoid wasting time checking the dictionary, you might want to write a list of synonyms before you play the game.

Follow me on Twitter and on Facebook


Please, Come In! 3 Activities to Start Off the Course on the Right Foot

Ahh almost October! How are we here already?

I can’t even wrap my head around the idea that this is going to be my 27th year teaching English. Time, please stand still! OMG, It makes me cringe to even think about it! Ugh. But, here we are.This is life.

I know, I know. Most of you have already started classes in late August or early  September, but here in the EOI in Asturias, we dedicate the whole month of September to assessing written and oral exams. Nothing to envy here, trust me!

Anyway, a new school year, new students, a fresh start, a clean slate. I feel like in these 27 years I have tried all the different get-to-know-you activities that have been used all around the world, so this year I’m going to recycle and tweak some of my favourite activities,  changing the context to fit the mood.

So, the plan for the first day is the one below. An interactive game to revise grammar and vocabulary from the previous year (lots of fun, but also lots of learning) and not one, but 2 highly engaging speaking activities that can be considered, if you wish, get-to-know-each-other activities but that can be easily adapted to any context.

Activity 1. A Kahoot to revise

We will start the course playing a Kahoot to revise some of the content studied in the previous course. Always fun and to be honest, I am going to be recycling the one I did last year. That’s one of the things I like about technology, it’s paperless, recyclable and “findable”( meaning, easy to find,  yes, I know, I have just invented the word)

If you ask students to play in pairs or in threes, you’ll just need a device for each group. I like playing Kahoots in groups. It enhances learning as students will need to discuss the right answer and it’s more engaging and therefore much more fun.

This is the link in case you want to use my Kahoot. Here


Activity 2.  Welcome post-it notes

(I know! It looks home-made, but this is because it is)

  • On one wall of the class, I have displayed the word “Welcome” formed using Post-it notes, as in the picture.
  • On the back of each post-it note, I have written a question that will help students and teachers get to know each other.
  • I have asked students to stand up and pick a post-it note containing a question.
  • I have asked students to remain standing, pair up with another student and ask each other the questions on their post-it notes.
  • I have allowed them about 4 minutes to ask and answer their questions before asking them to find a new partner.
  • I have also participated in this mingle activity. After all, I also want them to know me and it gives me a good chance to assess their English.
  • Please, refrain from overcorrecting or even correcting. It’s their first day.

Can’t think of questions to ask? This site has you covered. bit.ly/2zqxcJP

Idea for the post inspired by Post-it.com

Activity 3. Yes, I have, I have never

This activity is just so much fun.  What do we need? We need slips of paper, as many as students in the class. I normally fold a regular sheet of paper in half, lengthwise, and get two slips of paper.

  • I ask students to write on one side I HAVE and, on the other side, I HAVE NEVER. Ask them to write the words big enough to see from a distance.
  • Tell students you are going to ask them questions and they should display their slip of paper with their answer to the question.

For example. Imagine that I ask  Have you ever failed an English exam?

In the picture below, you can see Julio, the German teacher, and me exemplifying the possible answers (sorry, as I said, classes have not started yet and I had to bribe a colleague).

  • Choose one or two students to elaborate on their answer and then ask another question and repeat procedure.
  • To add to the fun, and because it’s also important that students get to know you,  you should also have a slip of paper and once or twice give some details about you.

Note: Make sure you ask randomly I have and I have never answers, otherwise some students might never display the I have option.

Possible questions:

  • Have you ever been on TV?
  • Have you ever won a contest a received a prize?
  • Have you ever been stuck in a lift?
  • Have you ever got in trouble at school?
  • have you ever helped someone who was in danger?

Get more questions here and here  

Hope you have liked my first post! If you do not want to miss any of my posts, you might  want to follow Blog de Cristina on Facebook and on Twitter.

Great to be back!!! I’ve missed you!

8 Google Chrome Extensions you “Add”solutely Need to Use if you are a Teacher

I have been struggling with the title of this post. I wanted to write it in capital letters and tried different angles, all with the same purpose, trying to entice you into reading it as I know for certain that, for some teachers out there, add-ons ( also known as extensions) are still unknown.


Introduction

Working as a “free app” teacher trainer has taught me quite a lot of things. I have seen that, contrary to my initial belief, most teachers are not afraid of introducing technology in their classes, they just don’t know how to do it or where to get started. Once they realize how easy it is to create their own activities, how little effort it takes to create meaningful activities for their classes using the feared apps, there is no ending to their requests to learn more and more, which is just awesome! On this post, I am going to comply with a request from one of the teachers attending the workshops at CPR Cuencas. Carlota, this post is for you.

During these workshops, over the course of a conversation I mentioned, and probably showed, the add-ons I use on Google Chrome to make my work more productive.  Surprisingly, most of the teachers attending didn’t even know what I was talking about. I promised I would show them the ones I used. But, with so many things to teach, we didn’t have time. I’m sorry. It took me a while to write this post, but here it is.

First of all, the basics

What is an add-on or extension?

These little icons you see next to the address bar are called add-ons or extensions. They are small apps that add extra features to Chrome and can improve your productivity, for example by correcting your spelling or grammar mistakes.  Awesome, isn’t it?

How do I install an extension?

Just click here and write the name of the extension you want to install.

How do I manage my extensions?

(it has background music)


My favourite Google Chrome Extensions

The ones I cannot live without, and in no particular order, are the following:

1. Send from Gmail by Google

The easiest and quickest way to share links

Let’s imagine this scenario. You are on a website you very much would like to share with a colleague or just send to yourself to explore later.  There are many things you can do with this link. For me, the easiest is using the add-on above, which will open my Gmail account. To do it, just click on the extension, enter the recipient’s address and click Send.


2. Tab Resize- split screen layouts

The easiest way to split your screen into separate tabs

Very often, we need to see the content of two or even three windows in the same screen. For example, when doing a grammar exercise online we often need to refer to the grammar or when correcting a listening comprehension we might also want to display the transcript.  This is easy with Tab Resize. You just need to click on the icon and choose how to split your screen.


3. Grammarly for Chrome

To make sure you don’t send an important document or an email with spelling, grammar or punctuation mistakes.
Isn’t it helpful? I don’ t know about you, but I am not perfect.

Look at the picture below. Writing this blog, I have made a spelling mistake. Immediately, my mistake is highlighted and an alternative suggested which, of course, you can choose to ignore. Wow!


4. Bit.ly

To shorten the links you want to share

Isn’t it true that very often we need to provide students with a URL that is impossible to write because of its length? When this happens, what do you? I use bit.ly, which is a URL shortener. Surely, you can go to their website and copy-paste the URL to obtain the shortened URL, but wouldn’t it be more productive to just click on the icon, copy the shortened URL and share with your students or colleagues? That’s what I do!

Once you get the shortened link, just write on the board for your students to copy. A piece of cake!

(it has background music)


5. Google Dictionary

With this extension installed, finding the meaning of a word and how to pronounce it couldn’t be easier. There are two ways to do it:

  1. Double click the word and you’ll see a little pop-up bubble showing a brief definition.
  2. Select the word and click on the add-on icon on the toolbar to get the complete definition of any word.

Note:  after installing the add-on, either reload your open tabs or restart Chrome.


6. Pinterest Save Button

To curate the web

I have been using Pinterest since it was first launched. I don’t think I could live without it. That’s the place where I store every inspiring idea that I see on the web, every activity I want to use in class, every blog that I want to read or every video I want to play in class.  Over the years I have tried other tools to organize and collect content but I have yet to find one that is as simple and as widely used as Pinterest to curate content. Suffice to say, I have about 150 boards and growing. See them here.

So, how does it work? Let’s say you see an interesting activity you want to use in your classes, but will you be able to remember where you read it?  I don’t know about you, but I read so many blogs that it’s impossible to remember who wrote what and where.

The extension Pinterest save Button has really saved my life. I see something I like, I click the Pin button and store it in one of my boards. See the video below. Obviously,  first you need to create an account on Pinterest.

(it has background music)


7. Google Drive New Tab

This is just a shortcut to opening my Google Drive.  If you don’t use Google Drive, then it’s not very useful to you but if you do,  it saves lots of time.

So, just click on the icon on the toolbar and a new tab will open on your Google Drive. Simple but effective.


8. Awesome Screenshot

An add-on that lives up to its name. It allows you to easily capture all or parts of any webpage. You can add comments and annotations and also blur some parts. It also allows you to record your screen in an easy way.

Thanks for reading! I know it is a long post, but hasn’t it been worth it?

Tips and Tricks: Some Essential Basic Tools any 21st Century Teacher should Know About.

Do you know how to download a video from youtube or convert a PDF or a website into an editable Word document? Do you know where to find free images and videos to use in your projects or how to record audio and create a QR code to share with your students and colleagues? Did you know that long URLs can be easily shortened so that they can be shared more easily?

If you don’t, then this post might be for you!

I’m not a digital native. Far from it. Everything I know I had to learn by trial and error. However, right now, you can probably say I’m the typical technophile always on the lookout for new tools to create activities to spark up my classes.

The tools I want to share with you today are nothing fancy. You cannot create activities where your students will ooh and ahh, but trust me, they are going to save you a lot of time and a lot of searching. They have been tested and tried and I have been using them for a long, long time.


AUDIO AND VIDEO


Problem: I need to join/cut two audio files and I need to record myself on video/audio

Solution: 123apps.com/

This is a great tool to work with audio and video. It’s free, easy to use and you don’t even need to register.

What can you do on this page?

  • Cut video or audio ( you need to upload it from your computer)
  • Join two audio tracks
  • Convert video and audio from one format into another
  • Easily record video and audio ( and then download it)

Downside: you need to have the video/audio on your computer. Don’t worry, I’ll show you how to download a video. Keep on reading.


Problem: I need to record my voice/upload audio and then share it

Solution: vocaroo.com/ 

Vocaroo has been around for a long time. They are even working on a new and improved version. It lets you record your voice in a very easy way or upload a file from your computer. Then, you are offered different possibilities:

  • Download it
  • Share it on social media sites.
  • Share or email the link
  • Embed it on a blog or website
  • Get a QR code

Downside: Vocaroo does not provide permanent storage. There is not a definite age at which messages are deleted, however, it is likely messages will expire after a few months. If a message is important you should download and save it to your own computer as soon as possible to avoid losing it.


Problem:  My internet connection is weak and I need to download a video from a website other than youtube.

Solution:  videocyborg.com/

This amazing tool lets you download videos from any platform, even from youtube. To download a video, just get the link, copy/paste it into the box and download it. You can choose to download the video or just the audio.


Problem: My school has blocked facebook but I need my students to see a video there.

Solution: get the link for the video and then download it using  videocyborg.com/

Watch the video to see how it is done.


Problem: I need to cut a video from youtube

Solution: You need  tubechop.com/

Cut it, get the URL and then download it using videocyborg (link above)


TEXT


Problem: I need to convert a PDF into an easy editable WORD document

Solution: tools.pdf24.org/en/

This is a great tool to work with PDF. It’s free, easy to use and you don’t even need to register.

What can you do on this page?  Pretty much everything.

  • Convert a PDF into a Word document and  Word into PDF.
  • Split a PDF or merge them.
  • Sign or add page numbers to the  PDF.
  • Remove or extract PDF pages.


Problem: I need to convert a website into a PDF file or an editable WORD document

Solution: documentcyborg.com/

You only need to copy and paste the URL into the box, choose the format and download it and save it on your computer. You don’t even need to register.


Problem:  I have a scanned PDF or an image with some text and I want to extract the text

Solution:  www.onlineocr.net/

Onlineocr is free, simple and no registration is required. Copy/àste the URL ad then download the text as a Word document among other possibilities.


SHARING A LONG URL


Problem: I need to share with a long URL  with my students

Solution:  bitly.com/

Sometimes we have to give our students a long URL which seems almost impossible to type without making a mistake. Instead of writing this long URL, use bit.ly to shorten it. To do it, paste the long link in the search box and that’s it.


PRINTING A WEBSITE


Problem: I want to print some content from a website, but I don’t want to print all the images and adverts.

Solution:  printwhatyoulike.com/

Just enter the URL, edit the page getting rid of anything you don’t want to print, and then print it.


CREATING A QR


Problem: I need to create a simple QR Code with the answer to an exercise and download the QR Code to share it with my students

Solution:the-qrcode-generator.com/

Easy to use and doesn’t require registration. Just paste your text and then save it to download it.


FREE TEMPLATES FOR POWERPOINT OR GOOGLE SLIDES


Problem: I need to find beautiful free thematic templates  to make a presentation on Google Slides or PowerPoint

Solution: slidescarnival.com/

FREE IMAGES AND VIDEO


Problem: my students are doing a project and they need to find free images and/or videos

Solution: for free images: pixabay.com/ ;for free videos pixabay.com/videos/

I hope these websites are helpful and save you a lot of time.


Licencia de Creative Commons
Este obra está bajo una licencia de Creative Commons Reconocimiento-NoComercial-SinObraDerivada 4.0 Internacional.