Monthly Archives: October 2021

Learning Chocolate: a Free Website to Learn Vocabulary and How to Pronounce it.

It is not the first time I have written something about this great site to learn vocabulary but, it was such a long time ago, that I think it deserves to be brought to your attention again.

Learning Chocolate that’s the name of the website. Hey!! I even like the name. I wonder why they’ve chosen this name for a website that helps students improve vocabulary but it certainly does so and in a very efficient way.

What do I like best about this site? It teaches vocabulary in a visual way but also, and this of the utmost importance to me, is that it teaches students how to pronounce the words they are learning.

How does it work?

The vocabulary is organized into categories, ranging from the easy  Numbers or the Seasons to the more sophisticated Insect Life Cycle.

How do you learn with this page?

First, on top of the page, you will need to choose your language and also, the language you want to learn.

Now, you are ready to start.

  1. Choose a category. The main categories are: beginning, around you, daily life, your society, your world and special series.

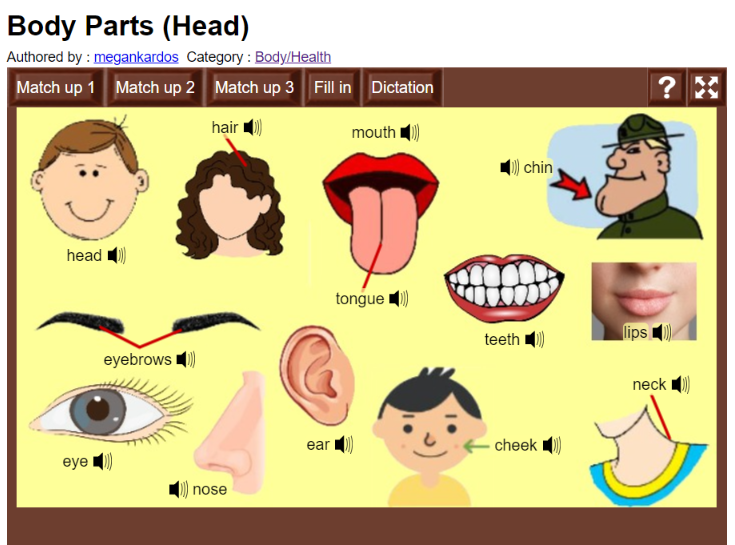
2. You will see words related to this category with the corresponding image and pronunciation.

3. The website also offers exercises to consolidate the vocabulary. For each category, you will find 3 match-up exercises, a fill-in the gaps and a dictation.

There are three different kinds of match up exercises:

  • Match up 1: you will find a list of words and below the words, a list of sound icons. Click on a sound icon and drag it and drop it to the corresponding word. When you finish, click Complete.
  • Match up 2: you will see the pictures and below the words to drag and drop.
  • Match up 3: same as match up 1, but in this exercise, you will see the pictures and not the words.

Also

  • Fill in: you will see several gaps and you will have to type the words that correspond to each image.
  • Dictation: you will find a list of sound icons. Click each of them and write the word you hear.

What I especially like about this site is that it uses visual aid to help students learn better and faster and, at the same time, teaches them how to pronounce the words.

An Outdoors QR-Codes Listening and Speaking lesson about Cities

I need to share this activity. It really has all the ingredients for a perfect lesson.

Things I want you to know about this lesson.

  • It is super engaging and gives your class a touch of modernity
  • It is collaborative
  • It deals with two basic skills, listening and speaking, but a lot of subskills are also at work.
  • It gives students and teachers a good excuse to stand up from their seats and even take the lesson outside, as I did.
  • It helps build rapport in the class, which is sooo important at the beginning of the course

I am not going to lie to you. It needs some initial preparation, but it pays off. Believe me! Besides, I find the whole process of preparing the activity very entertaining. Ok. I know. You don’t have time. The good news is that you can always use mine if you like my choice of cities.

  • Topic: Cities
  • Level: C1
  • Main skills: listening and speaking
  • Time: 50-60 minutes
  • Materials: here
Before the session
  1. Before the session, look for a video that can easily be divided into parts. In my case, we were learning about cities and their problems so I decided on this one 10 of the most overrated cities from one of my favourite channels on Youtube. I chose only 4 cities to form groups of 4 students.
  2. I used Camtasia to make 4 new videos, one for each city: Rome. London, New York and Río de Janeiro. If you don’t have Camtasia, don’t let this put you off, you can easily use the free online https://online-video-cutter.com/es/.
  3. Once you have the videos, you need to upload them to, for example, Google Drive.
  4. Once online, you need to copy the URL and create a QR Code. I create mine here. The Gif below shows how to do it once the video is uploaded to Google drive.

5. Now, you need to print the  4 QR Codes on separate pieces of paper.

6. Before the class, you will also need to tell students to download- I bet they already have it- a QR Code reader (I use QR Scanner) to their mobile phones and bring some earbuds for the next class.

Done!!! See? No big deal!! Now, everything is ready. Ready for the fun part!! 🙄

Tell the students this class will be done outside. Yay!! It could be the aisle or any other place on the premises that has enough room for the students to move. In my case, I used the schoolyard and pasted the QR Codes on the walls, well, not exactly walls as you can see from the picture.

Part 1.Listening and  Retelling
  • Ask students to form groups of 4. Each of them should choose a different city
  • Ask students to scan the code for their city and take notes.
  • Explain they will need to share as many details as they can about the city of their choice with their group. Apart from the main specifics of the city, they will need to explain why the city is overrated.
  • Allow 15 minutes for this part as students will need to watch their video several times to write down as many details as possible.
  • Next, students get back to their groups and start sharing the information gathered about their cities.
Part 2:  Speaking. Critical Thinking


In their groups, students talk about the issues the city in their videos has and together they debate whether the city where they live faces these same problems. Ask them to elaborate on their answers and offer possible solutions to tackle the problem.

Hope you have enjoyed my lesson and decide to give it a try!!

Teaching Students the Technique to Ace a Cloze Listening Exercise

Engaging, challenging and highly effective activity to teach students how to do a  Listening Cloze Exercise! This is a must-do activity to help students learn the technique for a fill-in-the-blanks exercise.

If I have to name the activity most of my older students find highly frustrating, it is probably doing a listening comprehension activity and not being able to understand anything. At least, that’s what they tell me. I suspect they are stretching it a tiny bit and they have managed to get the gist of what is being said but, already in a black mood when the audio finishes, they just feel they will never get better. The truth is that getting the gist is not enough when you are unable to answer the questions posed, especially when tested in an exam. That, we both know.

Though I always tell them that they need to work on this and promise that if they make a habit out of listening every single day, they will eventually get it and blah, blah, blah…, the truth is that we, as teachers, also need to find the time to explain how to do this kind of listening exercises.  Because although it doesn’t work magic, there is a technique… and it can help them.

It seems to me the beginning of a course is the right time to do it and so, this past week,  I set out to explain this technique.

But, you know me. With a game. Playing.

Step 1- Choose a Cloze Listening Exercise.

Step 2: Form Groups

Give all students the exercise on paper and ask them to form groups of 3ish people.

Step 3. Explain the Task

Explain that prediction in this kind of listening exercises is key. Stress the importance of trying to predict two things:

  1. The grammatical category of the word(s) that will fit in the gap: is it a noun, a verb…etc?
  2. The challenging part: ask students in their groups to try to guess the word (s) that they think will fill the gap. Ask students to name a secretary in the group that will be in charge of writing down their guesses.

For example in Number 1, one group might write “their teachers” but another group might decide “parents”  is the best option.

Give students some individual time to read the text and start thinking about the options. Then ask them to join their groups and decide on one option for each gap.

Step 4. The Whiteboard

Divide the whiteboard in as many columns as groups- see the picture- and ask the secretaries of each group to come up to the whiteboard and write their options. Comment on any coincidences to build suspense- in the picture, have a look at question Nº 2, they all wrote “culture”-.  Remember you are teaching them the technique, but it is also a game.

Step 5: the Listening

Play the audio (2 or 3 times). At this point, ask students to focus on their exercises and forget about their guesses.

Step 6: The Winners

Correct the listening exercise. Write the correct answers on the board and give 1 point for every coincidence. You know who the winner is, don’t you?

Note: In one class, one group got as many as 4 correct answers without even listening to the audio. Amazing, isn’t it?

Do you want to try? Follow all the steps and then listen to the audio. Check. How many wild guesses did you get right? Surely, you can’t expect to wild guess the exact number for gaps 3,5 and 6 but you know that it is a number and that, is saying a lot. Answers here.