Category Archives: Speaking

Making Vocabulary Stick: a Fun Game to Make New Terms Stick

It is said that you need to use a new word at least ten times to be able to remember it. I don’t know what to say about it.

I should probably not be saying this, I know I shouldn’t, but I can’t let it pass.  For some students, using the word once or twice is enough and for some others, you can work on it and repeat it until the cows come home and still, no luck. If you are a teacher, I know you understand what I mean. Fortunately, this is not true for most of my students  🙂 🙂


This is a simple activity you can do to encourage the use of newly-acquired vocabulary and to help students remember it.

I’m afraid if you don’t have a computer and OHP in your classroom, this activity would probably be useless to you. So, I won’t blame you if you stop reading right now.

  • Topic: Travelling and holidays. (You can easily use any other topic).
  • Level: Upper -intermediate (I would say this activity will work well with B1 students and upwards)
  • Time: about 30 minutes

Pre-game

  1. Activating previous vocabulary. I introduced the topic by asking students to discuss in pairs some uncomplicated questions, such as:

      What kind of holidays do you prefer?  Do you prefer package holidays or making your own?

       2.Introducing new vocabulary.  Nothing fancy here. I introduced and worked on new vocabulary using a variety of activities, but most from their textbook.

Boring part over.

Game.

  1. Brainstorming. I asked students to close their books and, in pairs, brainstorm words and expressions related to the topic. I completely forbade “easy” words such as plane, ticket or suitcase. Reserve some “Awesomes and well-dones” for the advanced vocabulary they are likely to provide.
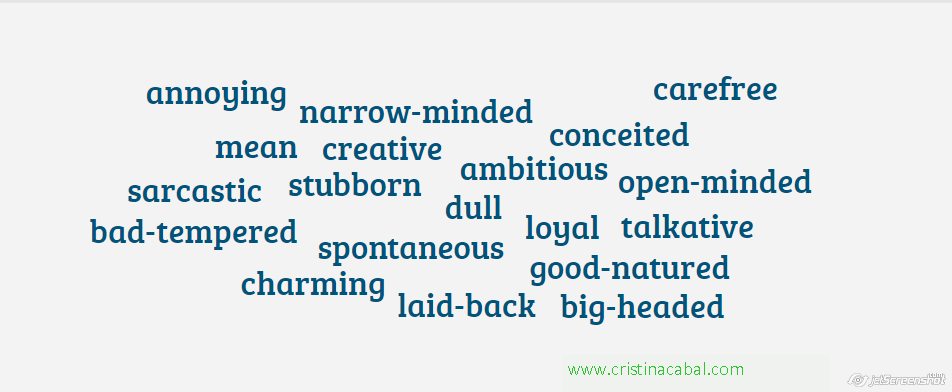
  2. Using a word cloud. In my computer, I opened the free word cloud generator https://wordart.com/ . I like this tool for two reasons:
  • it allows you to maintain words together very easily.
  • It very nicely highlights the words you want to work with.

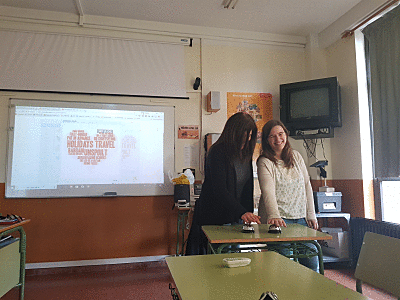
I asked a student to help me with the typing of the words. So while I was writing on the board the words students volunteered, he was typing these same words in the wordart app.

  1. Magic. When all the words were written and after drilling pronunciation and meaning, I cleaned the board, turned on the overhead projector and magically displayed the word cloud containing all words they had provided.

(click on the image)

Steps 1, 2 and 3 took about 5 minutes.

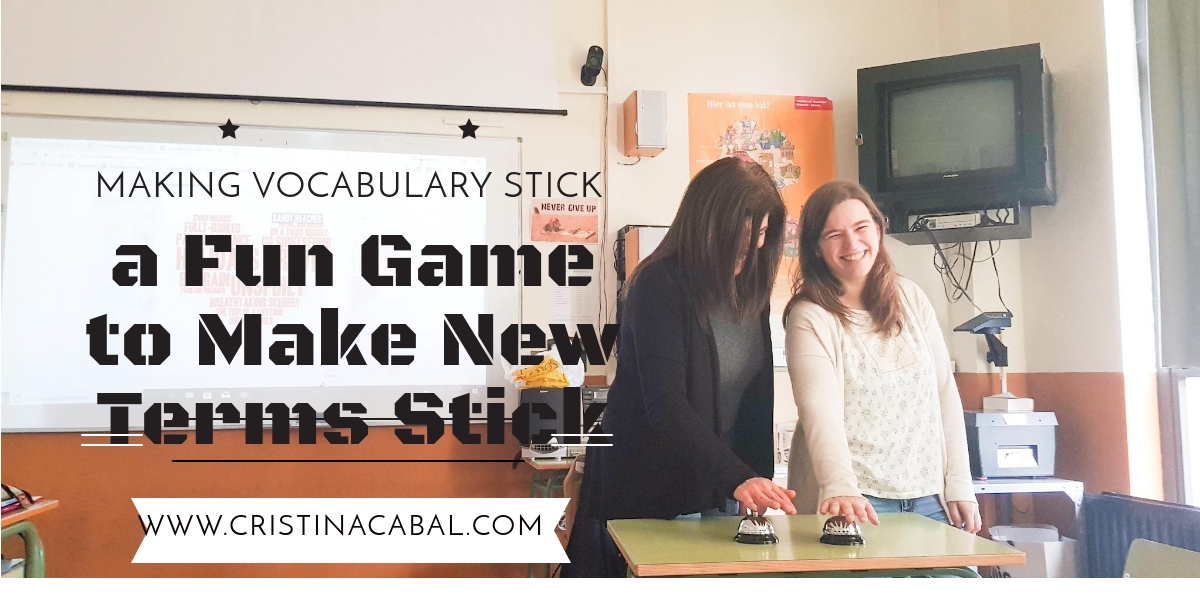
  1. Teams. I divided the class into two teams and asked a representative of each team to come to the front of the class facing away from the board where the word cloud was displayed. Let’s call them Captain A and Captain B. Place a table (or two) in front of the students and on the table(s) place two reception bells. I got mine from the Chinese Bazaar shops. If you can’t find the bells, any other sound would do! But, there has to be a sound, mainly, because it’s fun!

Procedure:

Team A starts. I point to a word (very nicely highlighted in this app) and team A has to describe the word to their captain using synonyms or paraphrasing. The only problem is that both Captains can press the bell if they know the word. Teams have 1m 30´ to describe as many words as possible.

Award one point for each correct guess.

Some more rules:

  • If the two captains press the bell and answer at the same time, the point is awarded to the captain whose team is playing.
  • If the two captains answer at the same time, but one of them has not pressed the bell, the point is awarded to the other team.
  • If a captain gives the wrong answer, he cannot answer again until the other captain has had a chance at guessing. In this case, the other team can try to explain the word to their captain.

Have fun while teaching and your students will learn better!!!


Step by Step: How I train my students to pass Part 2 (the pictures) of the standardized speaking exams. Part 1.

Alright, alright!

I know this is the third time I’ve posted this week. It seems I’m full of energy after the Christmas break. I really needed that break, didn’t you? Anyway, happy to go back to teaching, but hanging ominously over my head like a black cloud about to burst is the pressing necessity to start training my students to take their standardized speaking exams which will allow them to promote to the C1 (advanced level).

For those of you who are not familiar with the exam, let me explain how it goes. You might find you can apply it to your own classes, even though it’s not exactly the same kind of exam.

There are two tasks in the speaking exam.

  • Part 1: examiner-led conversation. The examiner asks questions about a topic and the students give full answers.
  • Part 2: the monologue, where the students are given a set of pictures (normally two or three).

About Part 2

In this second part, the one this whole post is built upon, the student is offered two or three colour photographs. Normally, the photos are in contrast or represent different options of the same issue.  Also, there is a title or a statement which suggests the topic of the monologue. After some thinking time, normally a couple of minutes, the student is given the opportunity to speak for about 4-5 minutes without interruption.

At this level, students are expected to talk about the topic using a wide range of vocabulary and grammar structures and they will have to compare and contrast the pictures talking about the most important issues related to the topic.

Students face different fears when preparing for the oral exams. Some of them are:

  • Do I know enough specific vocabulary?
  • Will I be able to use a variety of structures or will I stick to the simple subj+verb+complement structure?
  • Now,  the topic is “food”?  3 or 4 minutes talking about food? Seriously?  For heaven’s sake, I cannot even talk for one minute, let alone three or four!

Vocabulary and ideas. Keywords here.

How I train my students. Topic: Food

This is how I help them step by step. Bear in mind this is the first post of a series of posts dedicated to training students to pass the oral exam. As students gain confidence, guidance will be less necessary and some of these steps will be either unnecessary or done by students as part of their learning process.


1. Brainstorming vocabulary. Learning progresses through prior knowledge, so tapping into students’ prior knowledge is an essential part of learning.

On the board, we brainstorm the vocabulary they already know. This is an important step because it helps students reinforce and bring to life the vocabulary studied in previous courses.

Then, I ask them some very simple questions where they can activate this vocabulary: What’s your favourite food? What is the most expensive restaurant that you have ever been to? What did you eat there?


2.Acquiring new vocabulary. We work on new vocabulary using a number of written and oral exercises. (Any good course book provides enough vocabulary input, at least to get started). It’s important to emphasize here the importance of learning words in chunks. Surely, you can teach the word “ obesity” on its own, but there some other words you really want to teach in collocations like, for example, “eating disorders” or to “be obsessed with”. Also important, essential I should say, is pronunciation.


3.  Getting Ideas. Reading and Speaking. More often than not students find it hard to think on their feet. They find it difficult to come up with ideas that will fill in the 3 or 4 minutes allowed for this part.

You might disagree with me here, but I always tell them that oral exams are like the rest of the exams they might take. They need to prepare. They need to study.

Lack of preparation might result in something I’ve seen very often when assessing oral exams; students might talk for one minute and then, suddenly, stop. Now, you might wait patiently for them to come up with something else but the truth is that very often, when prompted to continue, they just repeat the same ideas they have already used. Why? most of the times due to lack of preparation. They mistakenly think that they don’t need to study for oral exams. They do.

So, listen up dear students! You need to study for oral exams.


Reading about different issues related to the topic not only reinforces the vocabulary they have learnt and gives them a chance to see it used in context but also gives them ideas of what they can talk about when doing the real task.

I normally use short extracts from The Pais in EnglishHere’s my choice of extracts for the topic of food. This how we do it:

  • We read the extracts in class or set the reading task as homework.
  • We underline relevant vocabulary.
  • Students discuss the questions in pairs, followed by class discussion.


4. The pictures. I am lucky to have a computer and an overhead projector in my class, so I normally display a collage with two or three related pictures on the board. You can see the ones I have used for this topic here and here.

Together we read the title and brainstorm ideas to fill in these 3 or 4 minutes. This step should be easy now as we have previously discussed some ideas in the previous task. Some ideas could be:

Together, we brainstorm vocabulary

  • Pesticides
  • Label
  • To be obsessed with
  • Bulimia
  • Fats
  • Proteins
  • Carbs
  • …etc

  1. Tips.
  • Look at the pictures and the title if there is one. It will hint at what you need to talk about.
  • If you are given some thinking time, use it.
  • Remember that you are not asked to describe in detail what you can see in the pictures. You are asked to compare and contrast the pictures talking about the topic.
  • Focus on three or four ideas and develop them as much as you can without repeating yourself. Start with a short introduction about the topic, talk about the first idea, develop it; start with the second idea and repeat procedure.
  • Don’t forget to use specific vocabulary and a variety of structures.
  • Essential: practise a lot and record yourself taking the exam.

6. Homework. Further practice. Collaboratively writing on a Padlet.

This follow-up task has two main aims:

  • to reinforce acquired knowledge and strategies
  • to share ideas. By asking students to write on a  collaborative Padlet, they benefit from each other and see other ideas which might help them improve their own performance.

All the Padlets created for this purpose will then be shared in a single one where students, at a glance, can decide what topic to revise.

In the next post, we will move from writing to speaking on a Padlet.

Blog de Cristina is also on Facebook. Follow us

Ready-Made Lesson: Personal Identity

I must have been in my teens, but I vividly remember my mother telling my father that someone called James Dean had called. The funny part was not only that the famous now-long- deceased actor had phoned my dad, but the way everybody pronounced his name, /jamez dean/, as if it was the most natural thing in the world, while me and my naughty siblings couldn’t help cracking up, repeating /james dean, james dean/while in stitches. (The Spanish pronunciation of the “j” is similar to the Scottish word “loch” or the German word “Bach”)

In case you are wondering, my parents (now almost 80)  had never ever heard a word in English so everybody said /james dean/ just like that and never gave it a second thought. We, me and my three siblings, just liked fooling around. I know better now!! 🙂

About the lesson:

In this lesson, aimed at B2 students and above, students discuss their names and their personalities through some engaging activities.

In part 2, you have the possibility of asking students to use their own devices and complete the task in class or alternatively set the task for homework.


Part 1. Talking about your name

A video-based listening activity

Tell students they are going to watch a short extract from the Graham Norton show, where the actresses Meryl Streep and Nicole Kidman discuss their birth names. Play from 0:00 until 2:50.

Introduce: 

  • To be named ( after someone)
  • To name someone
  • A pet name
  • A middle name
  • A nickname

Procedure:

Play the video once and ask students some comprehension questions. Play the video a second time if necessary.

  1. Meryl Streep was named Mary at birth. How did she end up being called Meryl?
  2. Is she happy about her surname? How does she wish it to be different?
  3. Why is Nicole Kidman called Hokulani? Who is she named after?

Discussion questions:

  • Are you happy with your name? Why (not)?
  • Does your name have a meaning? If so, what does it mean?
  • Do you have a middle name? What is it?
  • Do you have a nickname? If so, what is it and how did you get it?
  • If you could change your name would you? What would it be? Why?
  • U2’s lead singer, Bono, called his daughter Memphis Eve and Gwyneth Paltrow’s daughter is called Apple. Do you know any “normal people” with unique baby names? What about you, do you prefer giving your child a more traditional name or a unique name?
  • In some countries, when women marry they take their husband’s last name? What do you think of this?

Part 2. Talking about your personality

In this second part, we are going to revise and learn some more complex personality adjectives.  To introduce personality adjectives we are going to use a website which analyses your personality based on the numerical value of your name. Whether students believe in it or not should be irrelevant, we are only interested in language acquisition here.

The warm-up

As this lesson is aimed at upper-intermediate students and above, students will have some prior knowledge of the most common personality adjectives, at least enough to get them started.

Choose any activity from 10 Games and Activities to Practise Personality Adjectives, a very successful – if I might say so-blog post I wrote last year

Homework.  The Website.

Ask students whether they think a name can shape their personality and refer them to this website where they’ll have to write their name in the space provided and read about their personality.

You can always ask them to read their horoscope, but this is “old news”, so I thought this might better spark students’ interest.

At home, students go to the website and find out about their personality based on their names. They look up any new words they don’t know, especially personality adjectives, as they will need to share this analysis with their classmates and say whether they agree or disagree with it, giving reasons.

Gathering Feedback

This activity can be done in a traditional way i.e board and chalk. Students call out an adjective and you write the personality adjective on the board.

Again, with the aim of creating a more engaging activity, I’m going to use a free online tool called “Answergarden” to get instantaneous feedback. The tool is very easy to use. Here’s a tutorial in case you need it, but it really has a very friendly intuitive interface making it very easy to use, even for those teachers who are not too tech-savvy. The app takes students answers and creates a word cloud that can be exported or embedded.  Students will need to use their own devices but, if necessary, every three students can share one.

Once you have created the word cloud in Asnwergarden, use the overhead proyector to display it and ask volunteer students to explain the meaning of the adjectives and say whether they think it is positive, negative or neutral.

Below, an example of a word cloud created with Answergarden.

Speaking

Put students in pairs and ask them to share their name report from the website and say whether they agree or disagree with such analysis.

Ask them to discuss the following questions.

  • What kind of people do you usually get along with?
  • What kinds of personality traits do you hate?
  • Is your personality more similar to your mother’s or father’s?
  • Do you think we are born with our personalities, or do we develop them because of what happens to us?
  • Do you tend to fall in love with good looks or with a great personality?
  • Does one person’s character affect the personalities of the surrounding people? Are you influenced by anybody you know?
  • Does birth order affect personality? What qualities do a first-born child, a last-born and an only child have?

The Quiz: As Free as a Bird. 

Let’s go the extra mile! In this quiz, you’ll find more colourful ways to talk about someone’s personality. In order to learn them, I suggest taking the quiz two or three times, the last time checking if just by looking at the picture students can remember the simile.

After doing the quiz, you can always ask some follow-up questions like:

Do you know anybody who is as stubborn as a mule?

Enjoy!

Oral Exam: Monologue Based on One or More Pictures. Some Tips and Ideas to Get Started

In the intermediate and more advanced exam you will be presented with one, two or more pictures about the same topic but in clear contrast. It’s important to remember that you are not supposed to give a detailed description of everything that is happening in the picture(s). On the contrary, what is important is that you talk about the topic or idea suggested in the picture(s). If you are given  for example 3 minutes to talk, use just one minute of this time to describe in general, using appropriate language and structures; the rest of the time should be dedicated to talking about the topic and giving your opinion.

BEFORE THE EXAM

  • Make a list of the most common topics asked in the exam.
  • Brainstorm vocabulary you can use related to this topic. Mind mapping works perfect here. I use the free site Goconqr.

Mapa Mental creado con GoConqr por Cristina Cabal

  • Practise using sets of pictures in contrast. You can use my own selection here. (Scroll down)
  • If your problem is that you never know what to say, I suggest you have a look at some conversation questions you might be asked about the given topic. It will probably help you get started. Have a look at some common topics with questions here.
  • Listen to other students taking the exam (for example here) or read some examples here (fashion, global warming, jobs, new technologies and food)
  • Time yourself to control the time it takes you to develop your ideas.
  • Record yourself and then listen to the recording and see how you can improve it. You can use the app Soundcloud, which allows you to stop the recording and write comments.

(You can write a comment on a track through the text box below the waveform that says ‘Write a comment…’ and press your return or enter key to send. The comment will appear at the point on the waveform where you first started typing. Alternatively, you can click any free space in the comment section to leave a comment at that specific point)

  • The day before the exam, revise all the topics and the vocabulary you can use.
  • Half an hour before the exam, don’t speak your mother tongue. Spend the time listening, doing some silent reading or pronunciation exercises in English.

DURING THE EXAM

Before you start speaking:

  • If you are allowed 1 minute to organise your ideas, use that minute. I have often seen candidates not taking this minute and making a mess of the exam just because they didn’t take the time to organise their ideas.
  • Scan the pictures and identify the topic. Sometimes there is a title or a heading that helps you.
  • Try to come up with three ideas about the topic suggested by the pictures. Expand on these ideas.

Taking the exam:

  • Begin by giving an overall idea of what the pictures are about, using a variety of structures, modals to indicate possibility and the useful “look” or “seem”.
  • Talk about the topic. It’s easier if you relate it to yourself, but if you don’t have this experience, talk about a friend’s or just lie. This is an English exam, not a lie detector.

via GIPHY


  • Develop your ideas. Try to use linkers to connect your ideas.
  • Don’t give too complicated explanations. I’m sorry to say, you’ll probably make mistakes.
  • Give your opinion. Say which one you prefer and why.

Some expressions you can use:

Remember it’s better if you start by giving a general idea of what the pictures are about.  Don’t start like this:

In the first picture I can see

Start like this:

  • In this worksheet there are two photos. They both show different ways of (shopping).
  • These photos are clearly both connected to the topic of (science)… but in two quite different contexts. In the first one… In contrast, the second picture shows…
  • The photo/picture shows …
  • The first thing that strikes me about this picture is…


Remember that you are describing a picture, so you cannot be 100% sure of what is happening. Use language that suggests this:

  •  I think…
  • Maybe / Perhaps…
  • I guess they are…
  •  Modal verbs of deduction: she must / can’t /
  • Modal verbs of possibility: could, may, might
  •  She looks/seems… (tired)/ She looks like … (a teacher). It looks/seems as if (it’s raining)

PRACTICE.

Go to https://www.cristinacabal.com/?page_id=4906  and scroll down to the section SET OF PICTURES FOR PRACTICE and just “practise”. “A  lot!” 🙂


Are we Killing or Promoting Creativity? A Collaborative Writing and Speaking Lesson

Every child is an artist, the problem is staying an artist when you grow up.” – Pablo Picasso

I had a full-blown, real, very much needed holiday. The last two months had been unbelievably hectic: end-of-term exams, working full-time during the week and some teacher training weekends and, to top it all, I was also writing a project to apply for a European grant, which unfortunately I won’t get.

So, there I was, fully enjoying my break , when I stumbled upon an article in El Pais about a short animated short film “Alike”, which had won a Goya award in 2016, and I was struck with how beautiful, touching and thought-provoking the video was. And I just knew I had to show it to my students, do something with it and well, here it is. I hope you enjoy it as much as I did.

About the lesson: In this lesson, aimed at B2 students and above, students watch a short silent film called Alike (7 minutes) with two main aims:

  1. To give voice to the story and for this:
  • they will have to collaboratively write the story
  • they will have to collaboratively retell the story

2. To discuss some questions related to education, the promotion of creativity and         daring to be different.


Step 1. Warm-up: Copi and Paste

Tell students they are going to watch a short  video called Alike, where the main two characters are a father and a son whose names are Copi and Paste. Focus on the names, write them on the board and ask students to predict what the story could be about. Hopefully, students will come up with some of these ideas

  • (Lack of)Creativity
  • Imagination
  • Routine
  • Lack of ideas
  • Plagiarism
  • Inspiration
  • Deception

Step 2. Introducing the video and the task

Explain that the video they are about to see is an animated short film (7 minutes) called “Alike” where there is no dialogue. However, the video is so touching and thought-provoking that words are not necessary; images and especially colours play an essential role and are enough to tell this beautiful story and to give us something to think about.

Play the video once asking students to focus on how the colours (or lack of colour) help tell the story. You can also tell them that, later in the lesson, they will need to narrate the story so they need to concentrate on everything that happens.


Step 3.Working on vocabulary.


The next step will focus on teaching/revising the vocabulary they will need to know to write the story.  Below, some flipcards I have used with my students.
Flash Card Deck created by Cristina Cabal with GoConqr


Step 4. Collaborative Writing and Retelling

1. Form groups and assign each group a part of the story. The aim is first to write and then to tell their part of the story as it happens, but also to analyse the hidden meaning and the values it tries to highlight.

  • The day begins (0:06- 1:32)
  • At school/ at work ( 1:33-2:38)
  • Leaving the office/school (2:39-3:07)
  • The next days (3:08-3:52)
  • Copi’s surrender (3:53-5:00)
  • But one day (5:01-6:50)

Depending on the number of students, you can ask them to work in pairs or assign each group two parts.

2. Play the story once again for the students to take down notes and get stsrted with the writing task. Walk around offering help and guidance.

3.  Play the story again to help students polish their part.

4. Ask each group to name a spokesperson and ask these students to come to the front of the class and give voice to the story as you play it once again.  Be ready to pause the video as required.

(below my students performing)

via GIPHY


Step 4. Speaking


For this activity there should be a supportive atmosphere within the class.

Form groups to discuss the following questions. When all the questions have been discussed, the groups should report back to the whole class.

  • Have you ever done something different or behaved differently from your peers?
  • Do you remember a time when, for some reason, you stood out as different?
  • Do you remember a time when you went against the established rules?
  • What’s something you know you do differently than most people?
  • Do you think the way education is organized destroys children’s creativity?
  • Do you think education for children under seven is excessively focused on the curriculum?
  • Do you think that be learning to be creative is more important than knowing how to spell correctly?