Category Archives: Speaking

A Speaking Activity: Just a Minute Musical Chairs

Do you want enthusiastic students? Then, be enthusiastic yourself!

It is just amazing where you can get inspiration for your next class activity. Inspiration is capricious and might strike you while showering, running or watching YouTube videos.

To be perfectly honest, I do most of my thinking while I am driving to work. That’s probably the only time when I am not multitasking and can concentrate on only one thing: driving. And that is a far cry from the morning madness of preparing classes while at the same time thinking about the need to check the stew- that is almost always eaten with a lingering burning taste- or the shopping I need to do or the laundry I need to wash. While driving, I just drive. And think.

So, this activity sprang to mind while I was driving. As it is always the same road and I go on auto-pilot ( I am sure some of you can relate), I remembered a video I saw on Twitter of a workshop in an EOI in Madrid where teachers were playing what I think was, musical chairs. And it got me thinking.

Could I try it with my students? I teach adults and some of them are on the wrong side of 70. Will it work? It worked!

Before the game starts
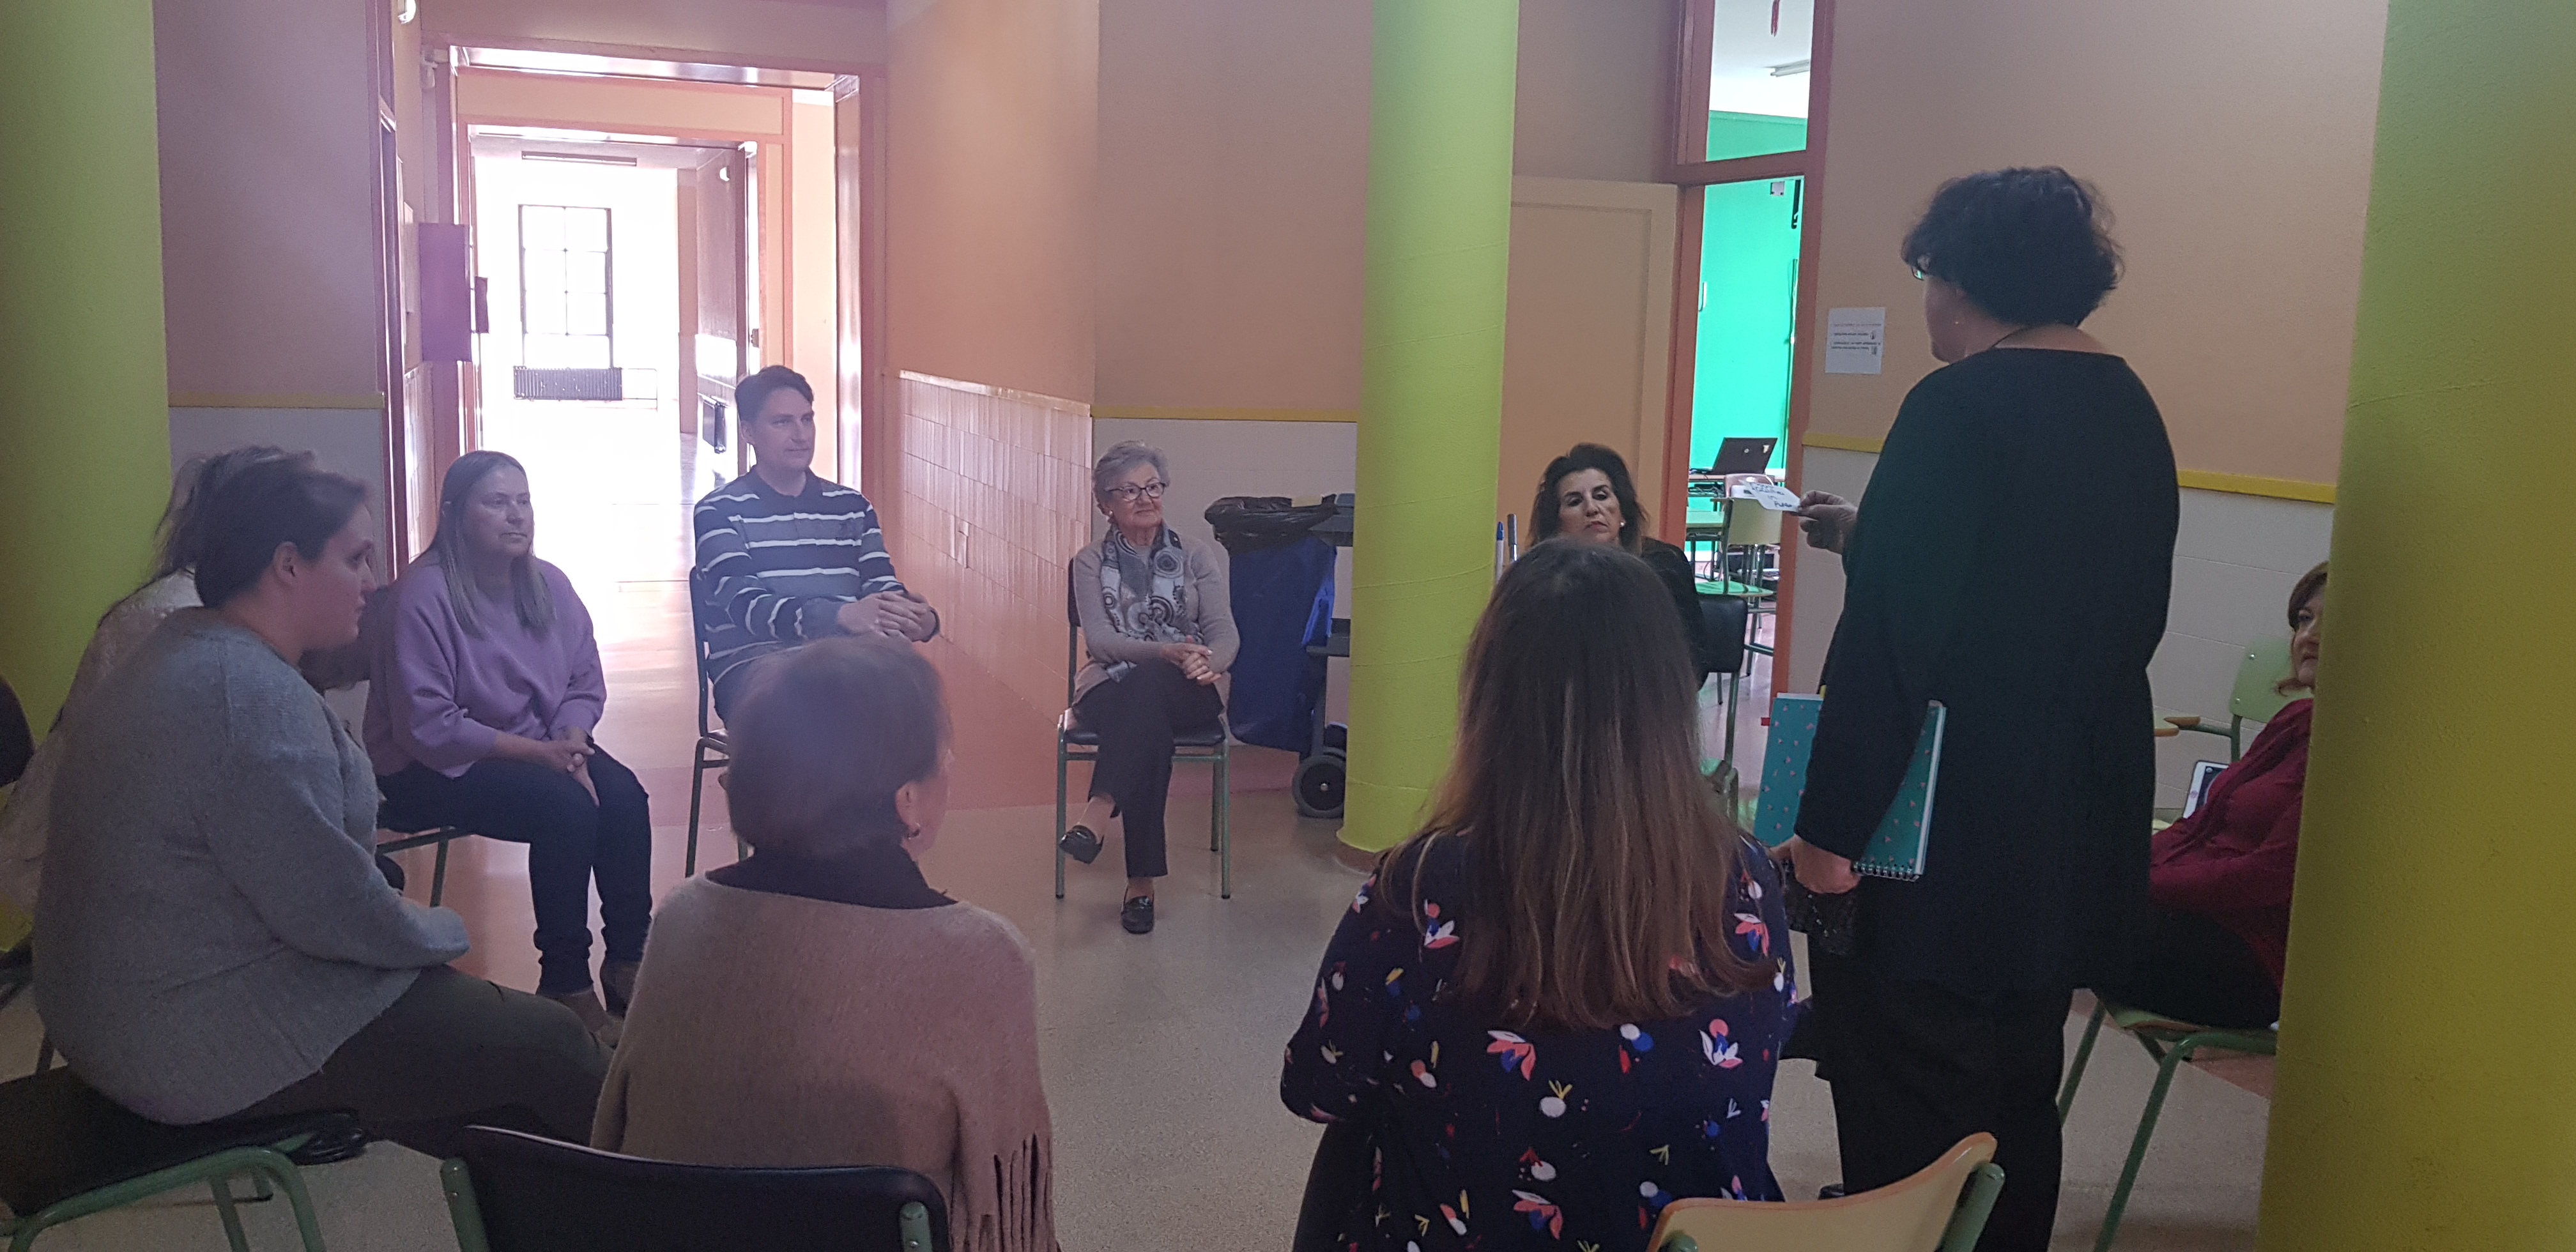
  • Arrange the chairs in a circle. There should be one chair less than the number of students.
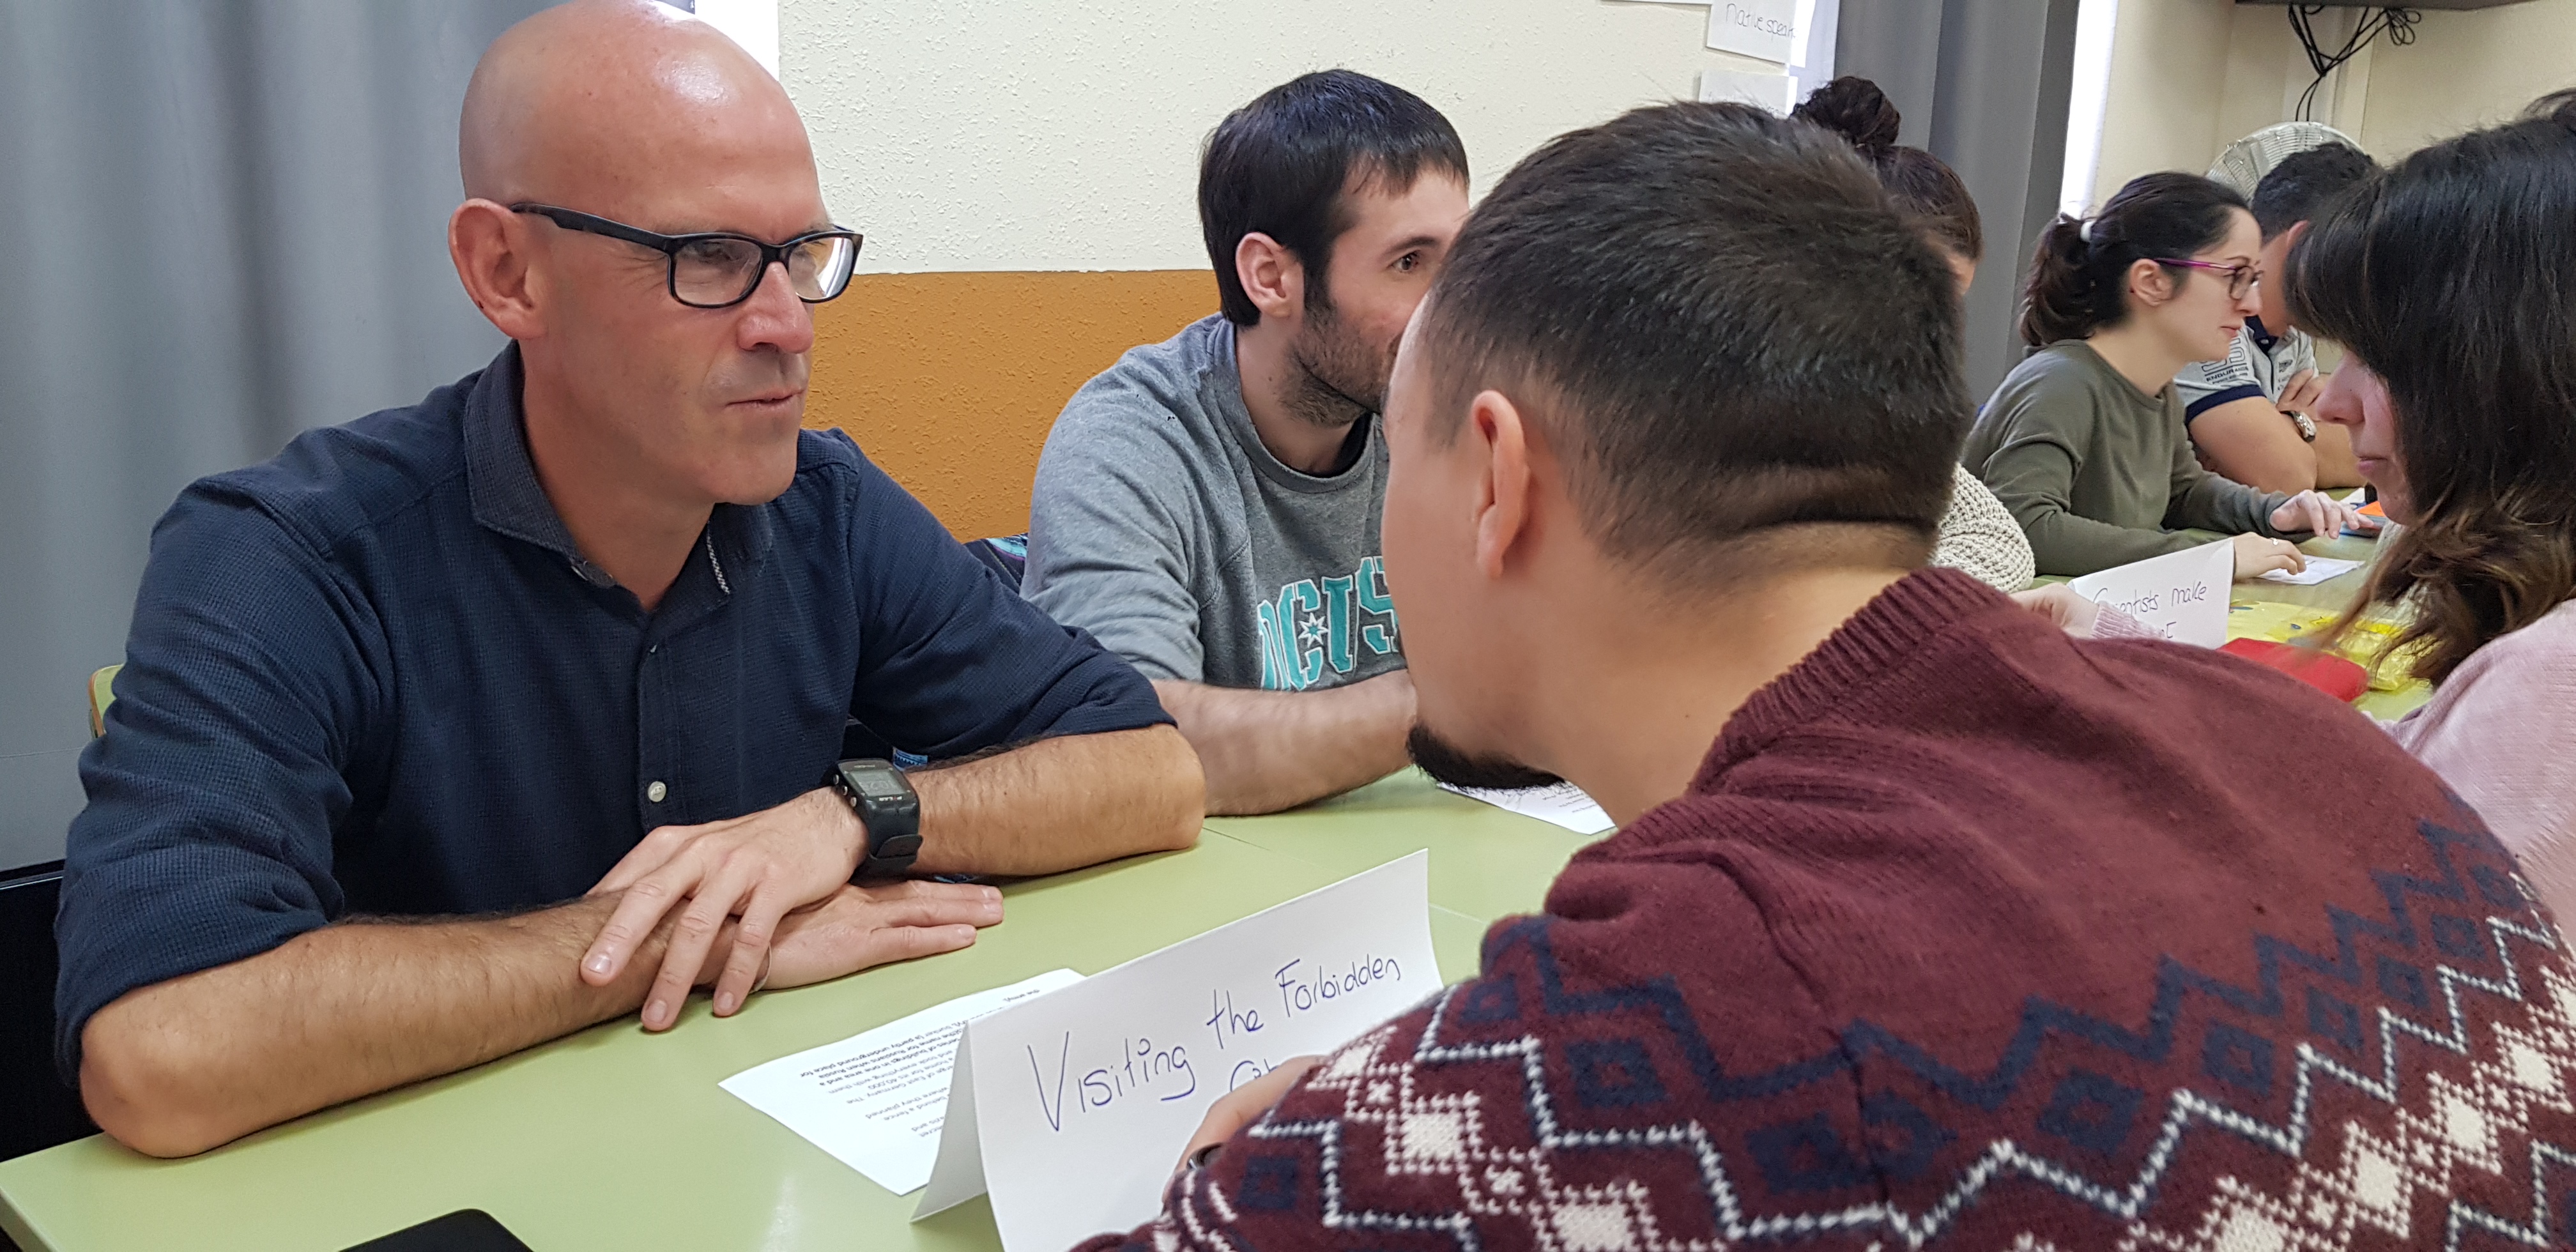
  • Write cards with some topics to write about. Alternatively, you can give each student a card and ask them to write a conversation question.
  • Without telling students, divide the class into two teams and write down on a piece of paper the members of each team. Don’t tell students which team they belong to. This will ensure that they won’t play tricks and save seats for a member of their team.
  • You’ll need some music. I have used my mobile phone to play”La Isla Bonita”

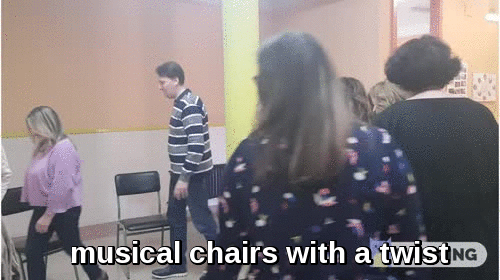
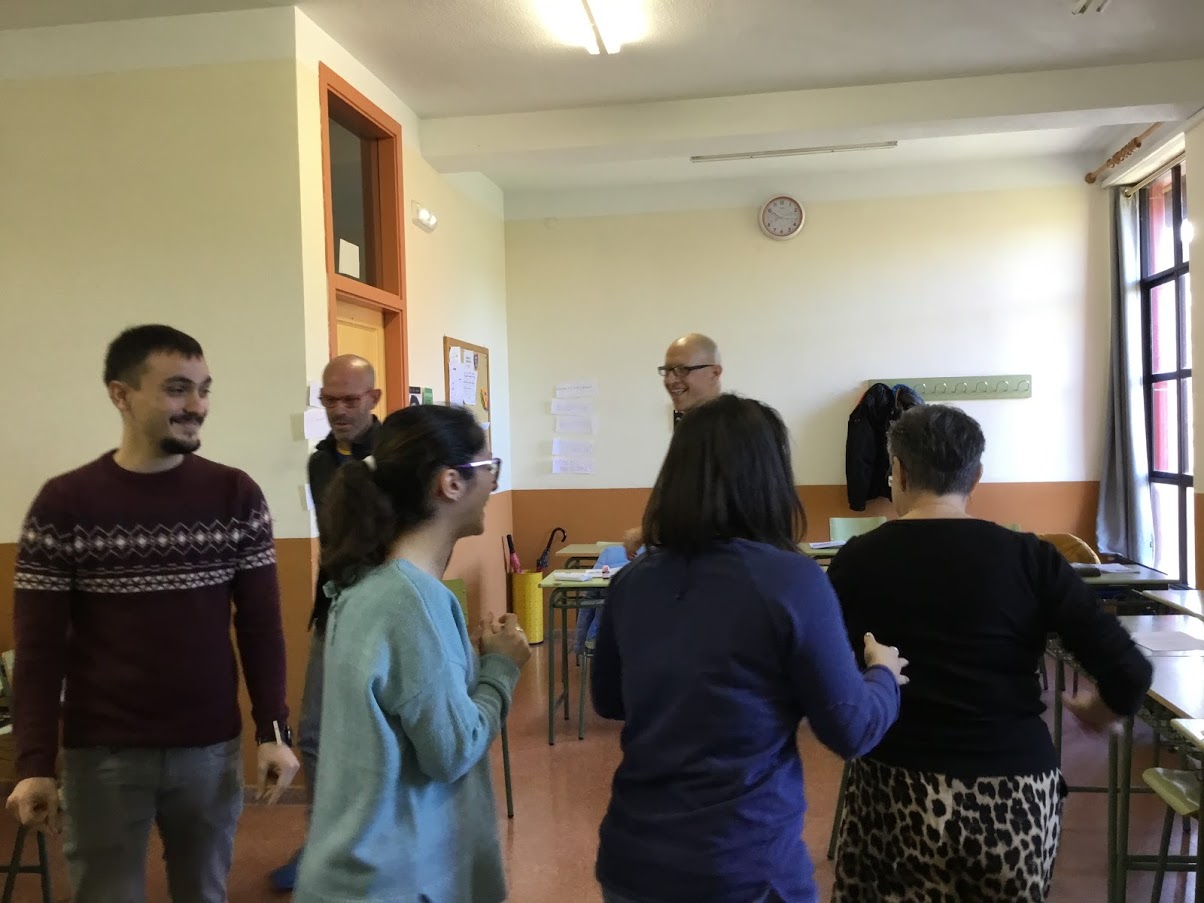
This game needs some rearranging of the class furniture. You will need to push the tables to the walls and form a big circle with the chairs. As my class is smallish, I use the hall just outside my class for this kind of activities. If the weather is nice, you can also take your students outside. I am sure they will be delighted.

Procedure
  1. Arrange the chairs in a circle. If you have 15 students, there should be 14 chairs.
  2. Tell students you have secretly formed two teams but they will not know the members of their team until the end of the game.
  3. You will need music and a timer.

Two options to play this game

Option 1.

  1. Ask students to stand inside the circle. Tell them that you’ll play some music and they will need to walk close to the chairs forming a circle.  When the music stops they should try to sit down on any available chair. As there is one chair less, one student will remain standing.
  2. Offer the student left standing the set of cards with the topic to talk about face down and ask him to choose one card.
  3. He will have to speak about the topic for 1 minute but if he pauses or hesitates, he will lose 1 point for his team. If he accomplishes the task, he will score 1 point for his team. You’ll have to keep track of the points awarded or taken off as until the end of the game no one knows which team they belong to.
  4. Repeat procedure as many times as you like. I have done it 6 times.

Option 2.

Everything is more or less the same but there is no music in this option.

1.The student standing in the middle need to say something along the lines of…

  • Move if you have a brother or a sister
  • Move if you have ever failed an exam
  • Move if you have ever lied to a friend

2. Again, the students left standing will choose a card and talk about the topic for one minute. The rules for Option 1 apply in Option 2.

Who wins?

Keep track of the number of points each team gets. The team with the most points at the end of the game wins! Reveal the names of the students in each team, add up the points and announce the winner.

What is my role as a teacher?

I am afraid I cannot just enjoy the game. I am teaching here and they are learning. So, while the student is making the speech, I am jotting down pronunciation slips and important grammar mistakes. When the exercise is finished, on the board I give them feedback as a whole class.

It is very easy for the teacher to overlook this part but for me, it’s essential my students understand that playing a game in class is only another way to learn.

Just remember, if you want enthusiastic students, be enthusiastic yourself! There is no other way!

Flipping Students: a Collaborative Project  with other EEOOII Using Flipgrid

It’ s April and temperatures should have risen but I am writing this post while outside it is freezing cold and raining. I guess this is the downside of living in the north of Spain!

I know this not the perfect time to share this activity as we are all heading for final exams,  and I certainly don’t expect any teachers to email me right away suggesting a collaboration for the next month, but I do hope you do not forget this post and that the next school year we can find a way to collaborate and join our classes.

Some ideas that prompted this activity:
  • To encourage autonomous learning: to find new ways of learning and offer more opportunities for students to do more oral practice in a safe environment outside the walls of the classroom.
  • To encourage the use of effective technology. For this project, we used Flipgrid.
  • To demonstrate how anybody can use technology as long as you explain and model how to do it. Some of the students in this project are older than 70.
  • To collaborate: To spice up the activity by having students from other regions and countries collaborate with my class.
Tool used: Flipgrid. 

Flipgrid is a powerful reliable website owned by Microsoft. It is 100% free. It is a fantastic platform for collecting video responses to prompts that you pose to your students.

Why do I like it?

  • Students can improve their speaking ability from their homes, repeating their performances as often as they like. Stress-free.
  • Teachers can listen and send written or video feedback via email if they wish.
  • Students don’t need an email address, which is perfect for younger students.
  • Students record or upload a video and they can pause while recording, trim their videos and add more time or just delete it and start all over again.
  • Recording time goes from 15 seconds to 5 minutes.
  • They can reply to each other’s videos.
  • Educators are 100% in control with video moderation, access controls, etc
  • You can easily connect your class with other classes, not only in your country but also all around the world using the GridPal feature. There are thousands of educators willing to connect.
  • Flipgrid works on computers, laptops or any mobile device. If you use a mobile device to make your video, as my students did, you’ll need to download the free app.

The Project: Steps followed

1.Finding teachers from other schools willing to collaborate

That was the first step. I needed 3 teachers from 3 different regions who had some knowledge of how Flipgrid worked. To be honest, I didn’t feel like sending tons of emails to the different schools asking for collaboration. I thought it would be time-consuming and probably ineffective.  Besides, I  am very active on Facebook and Twitter and I thought it was the fastest way to find potential collaborators. And Bingo! In just one week I  had my 3 teachers: Purva Bachani from EOI Guía (Sta María de Guía- Las Palmas(Gran Canaria),  Marisa Rodríguez from EOI San Roque (San Roque-Cadiz) and Silvia Oslé from EOI Torrelavega  (Torrelavega-Cantabria). We have never seen each other, but we share the same passion: teaching. We created a Whatsapp group to speed up the process of setting up the project.

2. Setting up the Grid and the Topic

I created the common grid (class) and using the Grid Actions Button selected Add Copilots. Then, I added Marisa’s, Purva’s and Silvia’s emails and sent them an invitation.  From that moment, they had all the permissions to edit and add topics, but they could not delete the Grid (class)or the Topic I had previously created.

3. Setting up the activity

As it was the beginning of the course, we decided to do two activities (explained below), trying to maximize as much as possible the interactive part. Once the topic has been created, Flipgrid generates a code that you share with your students. This code and a Google or Microsoft email account is all they need.

(What you see below is the Topic with the 2 tasks. The Grid (class) is called Flipping EOI Students)

Task 1. A get-to-know-you activity. We didn’t want the questions to be the usual where-do-you-live or what-is-your-favourite-food. A bit of research on the Internet and again Bingo! We found the perfect inspiration in the videos “73 Questions with…” where Vogue interviews popular celebrities and asks them some rapid-fire questions to get to know them. The questions are good and we thought our students could either write their own questions or practise listening comprehension and choose the ones they liked best. These were the 2 links we provided: Selena Gómez and Emma Stone 

We gave students about a week to record their first video introducing themselves, saying which school they were studying in and their chosen get-to-know-you question.

Task 2. They had to choose 3 students from different EEO0II and answer their questions. We asked them to talk for about 1 minute elaborating on their answers as one of the aims of the activity was to practise listening and speaking. To help students and show them how to respond to each other, I recorded a  short video tutorial.

This second task took longer than the first as they had to record three videos answering to three students. Lots of speaking here, preceded by lots of rehearsing= lots of learning.

Note: although at first, it took a bit of convincing, very soon they were really into the project and some students went as far as to record themselves showing some landmarks of their cities and some even dressed up using hats and fake moustaches or wigs.

The surprise. As a surprise for the students, and again using social media sites, we asked for collaboration from native speakers and managed to convince a bunch of them to do task 2 as if they were students, too.  It was a nice gift for them and a way to say thank you for being such nice sports. Here I want to thank people at Flipgrid headquarters for being so supportive and agreeing to collaborate straightaway. ( thanks George, Rayna, Ann, Karen, Joseph, Kathrina and so many others).  I am proud to be a Flipgrid Ambassador.

(below is a picture of some of the students that collaborated in this project. I have erased their names. The people in the bubbles are the students answering this specific student)

Follow-Up Activities:

Using our private Whatsapp group, we brainstormed post-project activities. These are some of the ones we did.

  • Mixtapes: A Flipgrid feature that allows you to combine videos from different grids. We created one of these MixTapes using the native speakers’ recordings, playing some of them in class and asking students to first identify the get-to-know-you question and then summarize the answer.
  • Another idea was to ask students to work in groups of 3 or 4, play a get-to-know-you question and ask them to answer it within their groups. Then, play the answers to the question and give a point to the students whose answers coincide with those on the videos.
The activity in numbers

351 videos recorded, 15,663 views and 89.7 hours of recorded time.

I think I can say that without a shadow of a doubt that we have passed this first collaborative activity with flying colours. Thanks Silvia, Purva and Marisa.  I could not have done it without you.


Developing Fluency Working with News and Fake News

Who needs a fabulous activity to add to their repertoire of activities to teach about the news and the media? Both hands raised? Awesome!

This activity has been inspired by a video I saw on Youtube where Louise Desmier, from British Council Spain, talks about CLIL and offers different activities that can be adapted to different subjects. Check it out 

The idea behind this activity is that by repeating the same information several times, students gain fluency, start making fewer mistakes and gain confidence. 

  • Topic: Newspapers and the media
  • Aim: to develop students’ fluency and incorporate new language by retelling a piece of news several times.
  • Level: Upper Intermediate and above
  • Time:  20 minutes
  • Materials: Short stories (level 2) from News in Levels.
Before the class

Before the class, choose a number of stories from News in Levels that look intriguing or you think might generate interest. Write the headlines of the stories on a folded piece of paper, big enough to see from a distance (see picture). If you have 12 students in class, there should be at least 6  different pieces of news.

Copy/paste each piece of news and print them on different pages. Each headline should be accompanied by their matching piece of news.

Note: You should also include one piece of fake news which, at the end of the exercise, students will need to guess.

Some of my headlines were:

  • Scientist make meat
  • Church sex scandals
Procedure

Bear with me. It takes longer to explain than to actually do the exercise

  • Divide the class into newsreaders and viewers. Ask the newsreaders to sit together in a different area of the classroom.
  • Ask the newsreaders to place their headlines on the desk visible to the rest of the class (viewers)
  • Give the newsreaders the news accompanying the headline and allow them some time to read it. Tell them they will need to retell the story behind the headline.
  • While the newsreaders are reading their piece of news, you can ask the rest of the class to do a small exercise from their textbooks. You don’t want them to be staring at you or wasting their time.
  • Once the five minutes are over, ask the viewers to stand up and choose the headline that intrigues them the most. They should sit facing the newsreader.
  • The newsreader needs to retell the news using his own words but, at the same time, trying to incorporate as much vocabulary from the story as possible.
  • Allow 2 or 3 minutes for this part.
  • Repeat the exercise asking viewers to choose a different intriguing headline.

  • Change roles. Ask students to change roles and repeat procedure. As, ideally, there will be more than 4 pieces of news they can always choose a different headline.

Once the exercise is finished, ask students in pairs to discuss and decide which news was fake news. Answer: the one about the spiders

Find some more fake news here

Hope you have enjoyed the activity! 🙂

Lesson Plan. Success and Failure

Step 1. Lead-in

Number 1. Display the collage below and ask students whether they know any of these people.  Ask them in pairs to discuss what they have in common.

Ask for feedback. Hopefully, they will tell you what you want to hear from them; that they are all very successful people.

The people below are Mark Zuckerberg, Oprah Winfrey, Bill Gates, Lady Gaga, Amancio Ortega and Jeff Bezos. Just in case 🙂

Number 2. On the board, write the words ” success” and “failure”. You might want to drill pronunciation /səkˈses/  and  /ˈfeɪljə(r)/. Ask: what are the verbs?  What are the adjectives?

Teach the adjectives successful and  failed  and the verbs succeed in/ at  and fail in.

  • He is a successful writer/ He is a failed writer.
  • He has succeeded in life/ he has succeeded at work/ He has failed in his attempt to win the race

Number 3.  Ask students in pairs to brainstorm vocabulary they associate to success and failure. You might want to teach some more advanced vocabulary. Ask students to write three columns on their notebooks ( words related to Success/ words related to failure/ related to both ). Write the words down, one at a time, on the board and ask students to tell you whether they are related to success or failure or both.

  • to accomplish / accomplishment
  • to achieve/( remarkable) achievement
  • to take risks / a risk taker
  • a visionary
  • a dreamer
  • an entrepreneur
  • an opportunist
  • to take a chance
  • to make a fortune
  • a half-baked idea
  • to chew over an idea
  • to be the main breadwinner
  • to save for a rainy day
  • unprecedented/modest success
  • to bring out the best in people
  • to be doomed to failure
  • to blow it
  • to be quite a feat
  • to suffer a setback
  • to do something as a last resort

Ask students in pairs to discuss the following questions. Encourage the use of vocabulary

  1. Talk about a successful person you know
  2. Is success important to you?
  3. What is your biggest success in life?
  4. Share with your partner a time when you failed at something. What happened? How did you feel?


Step 2: Listening: Cloze Test

Tell them they are going to see Lady Gaga’s acceptance speech at Oscars 2019 for best original song.

Procedure:

Display this gapped text with the OHP or print it. Don’t play the video  yet.


  • Ask students to predict the lexical category or part of speech that could fit each gap: is it a noun, an adjective, a preposition or maybe an article? Allow a couple of minutes for this task. You might want to show an example.

For example, I wrote a letter___ my mother (students will most likely agree, they ‘ll       need   a preposition to fill in this gap)

Let’s start:

  • Ask students to work in pairs. Ask Student A to face the board. Ask Student B to face away from the board and concentrate on the text.
  • Tell students you’ll write the words on the board in random order, but each of the words will be identified with a number. If you have 9 gaps in the cloze text, you will write the words on the board preceded by the number. Tell Student B to do the same in case he cannot guess a word in the allotted time. For ex: 1. house  2. wrote 3. for.
  • Write one of the missing words on the board, and ask student A to define the word, or give a synonym or antonym for student B to guess and write down. For example, if the word on the board is “wrote”, Student A might say “it’s a verb in the past and you use a pen or a pencil to do it”.
  • Tell students you’ll write a new word every 30 seconds. If Student B guesses the word quickly, he might try to use the rest of the time (up until the 30 seconds)  to try to place the word in the right gap but tell them you’ll not wait.
  • Continue in the same way until you have written all the missing words. The words should be written in random order.

NOTE: If one of the words hasn’t been guessed, at the end of this part Student A will need to try to define the words again. (Remember that the words are still written on the board).  This time, Student A can help Student B  by giving him the first letter.

  • Once they have all the words, Students A and B will work together to complete the gapped test.
  • Place a bell on your table and ask the first pair to finish to come up to your table. Silently check that the exercise is correct and if it is, ask them to ring the bell. From that moment, the rest of the class will have one minute to finish the exercise.

The missing words from Lady Gaga’s acceptance speech are: 1. sister 2. sung  3. hard  4. winning 5. fight  6. passion  7. fall  8. stand   9. brave.

Don’t forget to write the board in random order.

Play Lady Gaga’s acceptance speech and ask students in pairs to comment on it and give you feedback.

Step 3: Speaking. Quotes.

Ask students in groups of three to discuss the following quotes. Display the first quote and allow them to discuss it for about 4 or 5 minutes and then get feedback. Display the second one and repeat procedure.

A Word On Grammar: Would Rather

I love grammar, don’t you? But I’m not going to lie, sometimes I struggle with making grammar interesting. A lot of times it’s just plain boring grammar. However, when I am feeling inspired, using technology can change everything. Technology is great at showing content, you just need to grab the content from your course book and combine different tools to make a great lesson.

Step 1. The boring part. Teaching grammar.

I am not going to give you the spiel about how important grammar is. I guess if you are reading this blog, it’s because we are all on the same page here.

Feeling lazy myself today, I am going to give my students the grammar from this website: Cambridge English Dictionary. Who would know better?

Step 2.  Revising grammar with an animated video.

I am going to use the first 0:50 seconds and save the grammar for prefer and would prefer for a better occasion. You might need to play twice. The second time, I normally pause the video and ask students to give me their own sentences.


Step 3: The exercises.

This is a challenging exercise as all the sentences are different  and exemplifying different structures with would rather.

How to do it, or rather, how I do it:

  1. First time: I display the sentence and ask students to write down their answers. Allow about 1 minute for this task and then ask students to give you the answer, flip the card and correct.                                                                                                                                  Note: some students will prefer to do the exercise orally and you’ll see a bunch of them staring at the screen waiting for you to ask for the right answer. It’s important to insist that, in this part, they’ll need to write their answers down as it is the first time they will see a variety of different examples of the use of would rather and it might be challenging.
  2. Second time:  Class as a whole. Orally, do the exercise.
  3. Third time: at the end of the class or maybe the next day, I do it again, asking individual students to provide the correct answer.

I have used Quizlet to create the study set and I have shared the link with my students so that they can revise at home.

Flip the card to see the answer.


Note: there is nothing like technology to revise again and again without students getting bored. You just need to change the approach.

Step 4: Speaking. Digital Gallery Walk

An engaging activity using a more engaging tool to present it. Ask students to stand up- remember this is a gallery walk- and choose a partner to talk about the first question. Ask them to stop, find a new partner, and display question number 2. Allow 3 or 4 minutes per question and encourage students to use the target grammar in their answers.

If you want more oral practice, you’ll find lots of would you rather questions here. Some of them really give me the creeps and would rather not use them. But this is up to you!   🙂Powered by emaze