Category Archives: Resources

Are we Killing or Promoting Creativity? A Collaborative Writing and Speaking Lesson

Every child is an artist, the problem is staying an artist when you grow up.” – Pablo Picasso

I had a full-blown, real, very much needed holiday. The last two months had been unbelievably hectic: end-of-term exams, working full-time during the week and some teacher training weekends and, to top it all, I was also writing a project to apply for a European grant, which unfortunately I won’t get.

So, there I was, fully enjoying my break , when I stumbled upon an article in El Pais about a short animated short film “Alike”, which had won a Goya award in 2016, and I was struck with how beautiful, touching and thought-provoking the video was. And I just knew I had to show it to my students, do something with it and well, here it is. I hope you enjoy it as much as I did.

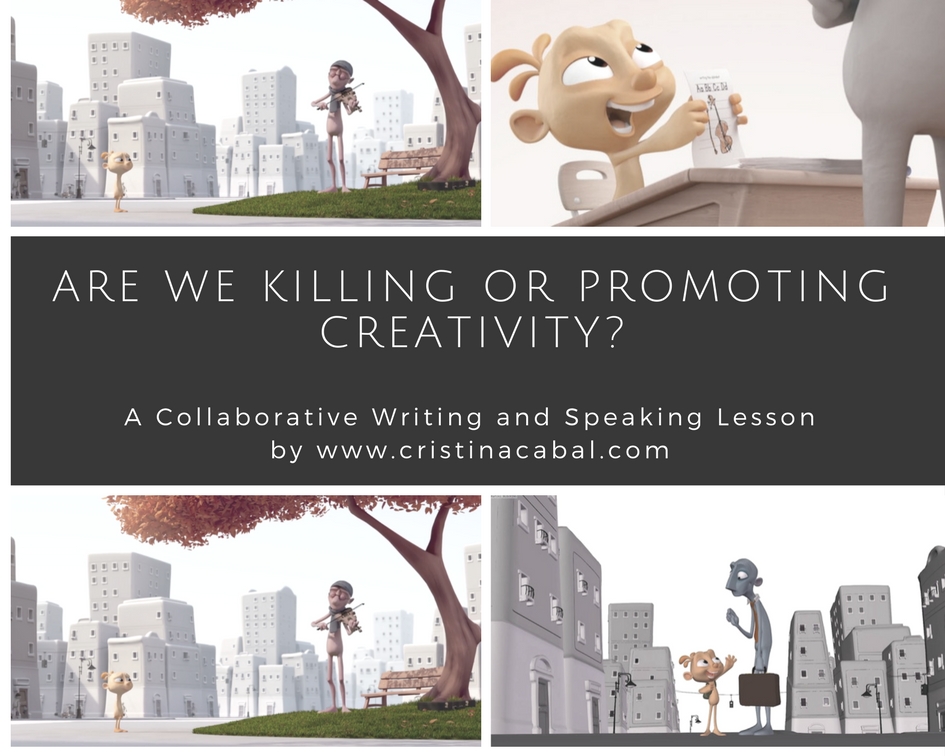
About the lesson: In this lesson, aimed at B2 students and above, students watch a short silent film called Alike (7 minutes) with two main aims:

  1. To give voice to the story and for this:
  • they will have to collaboratively write the story
  • they will have to collaboratively retell the story

2. To discuss some questions related to education, the promotion of creativity and         daring to be different.


Step 1. Warm-up: Copi and Paste

Tell students they are going to watch a short  video called Alike, where the main two characters are a father and a son whose names are Copi and Paste. Focus on the names, write them on the board and ask students to predict what the story could be about. Hopefully, students will come up with some of these ideas

  • (Lack of)Creativity
  • Imagination
  • Routine
  • Lack of ideas
  • Plagiarism
  • Inspiration
  • Deception

Step 2. Introducing the video and the task

Explain that the video they are about to see is an animated short film (7 minutes) called “Alike” where there is no dialogue. However, the video is so touching and thought-provoking that words are not necessary; images and especially colours play an essential role and are enough to tell this beautiful story and to give us something to think about.

Play the video once asking students to focus on how the colours (or lack of colour) help tell the story. You can also tell them that, later in the lesson, they will need to narrate the story so they need to concentrate on everything that happens.


Step 3.Working on vocabulary.


The next step will focus on teaching/revising the vocabulary they will need to know to write the story.  Below, some flipcards I have used with my students.
Flash Card Deck created by Cristina Cabal with GoConqr


Step 4. Collaborative Writing and Retelling

1. Form groups and assign each group a part of the story. The aim is first to write and then to tell their part of the story as it happens, but also to analyse the hidden meaning and the values it tries to highlight.

  • The day begins (0:06- 1:32)
  • At school/ at work ( 1:33-2:38)
  • Leaving the office/school (2:39-3:07)
  • The next days (3:08-3:52)
  • Copi’s surrender (3:53-5:00)
  • But one day (5:01-6:50)

Depending on the number of students, you can ask them to work in pairs or assign each group two parts.

2. Play the story once again for the students to take down notes and get stsrted with the writing task. Walk around offering help and guidance.

3.  Play the story again to help students polish their part.

4. Ask each group to name a spokesperson and ask these students to come to the front of the class and give voice to the story as you play it once again.  Be ready to pause the video as required.

(below my students performing)

via GIPHY


Step 4. Speaking


For this activity there should be a supportive atmosphere within the class.

Form groups to discuss the following questions. When all the questions have been discussed, the groups should report back to the whole class.

  • Have you ever done something different or behaved differently from your peers?
  • Do you remember a time when, for some reason, you stood out as different?
  • Do you remember a time when you went against the established rules?
  • What’s something you know you do differently than most people?
  • Do you think the way education is organized destroys children’s creativity?
  • Do you think education for children under seven is excessively focused on the curriculum?
  • Do you think that be learning to be creative is more important than knowing how to spell correctly?

Life Begins at 70: a Future Perfect and Future Continuous Lesson

To me, old age is always ten years older than I am”  John Burroughs

In this engaging lesson, students will consolidate the use of future perfect and future perfect continuous through some engaging activities.


WARM UP


Show them a picture of how you see yourself when you are 70 and explain why you see yourself like that. (below you’ll see the picture I showed my students). After some laughs and a bit of explaining, ask students:

How do you see yourselves when you are 70? Do you look forward to getting old?

Ask them to talk in pairs for two or three minutes and get feedback.


THE POEM- WARMING by Jenny Joseph


This is a nice opportunity to introduce poetry in class.

Explain that the poem they are about to listen/read, written by Jenny Joseph, goes hand in hand with the picture of yourself shown above. After listening to the poem, ask students whether they think the author is looking forward to getting old and why.

It seems the poetess is rebellious, but she is only comfortable to ‘break the rules’ when she has the excuse of old age and senility. Ask students what they think about her attitude.


GALLERY WALK

  • On the walls of the class display pictures of elderly people reflecting different attitudes towards life when they are old.
  • Ask students to stand up, have a look at all of them, and decide which one will best represent their attitude to life. They now return to their desks.
  • Ask them to write two sentences using the future perfect and two sentences using the future continuous, based on the picture they have chosen.
  • Get students in threes now and ask them to explain their choice to their partners and use the 4 sentences they have written.
  • For example and based on my picture
  • I will have tried parachuting when I am 70
  • I will have probably written a recipe book.
  • I will probably be living in Bhutan
  • I will be living life to the fullest

I have used these pictures to display on the walls.


SPEAKING


Students now work in small groups and answer the following questions about the future. Remind them that they need to elaborate on their answers, giving reasons and using different expressions to give opinions. All the questions contain either a future perfect or a future continuous form; encourage students to use these tenses in their answers.

You might find this handout useful

Looking Forward to the Future

Some Activities to Teach Gerunds and Infinitives

I always claim that English grammar is easy, especially when compared to the Spanish or French grammar, but it gets a bit messy when it comes to verbs followed by infinitive or gerund.

The easy thing to say is that

  • some verbs are followed by infinitive (promise to go)
  •  some verbs are followed by gerund (can’t stand ironing).

But then we find that,

  • some other verbs are followed by infinitive or gerund with no change of meaning (start to study/start studying)
  • while some others are followed by infinitive and gerund with a change of meaning (stop to smoke/stop smoking)

And to add insult to injury,

  • some verbs are followed by infinitive with to (offer to help)
  • some others by infinitive without to ( make me study)
  • some verbs are followed by gerund, but if there is an object pronoun in between the verb and the gerund, then the gerund becomes infinitive (recommended reading / recommended her to read) …

Amazing, isn’t it?

Well, I suppose there’s nothing we can do about it, so let’s get down to some serious studying.


  • Level: Intermediate
  • Time: 60 minutes

THE GRAMMAR.

Download the document here


      THE PRACTICE:

Exercise 1. The Quiz


Exercise 2: The Rewriting Exercise


3.  Speaking and/or Writing: Storytelling Competition


  • Go to wheeldecide.com. Ask students to tell you verbs followed by gerund first, and then verbs followed by the “to” infinitive. Feed the wheel with these verbs.
  • Explain that in this activity they will need to seat in a circle in groups of 4.
  • Explain that you will write on the board the beginning of a story and then, in their groups, they will need to continue it.
  • Write on the board the beginning of a story. You can use this Short Story Generator.
  • Spin the wheel.
  • To make sure students will use the verb in the correct way, ask them to tell you whether the verb displayed in the wheel is followed by infinitive or gerund.
  • The oldest person in the group will start telling the story using the target verb in the wheel.
  • Give the student one minute to continue the story and then spin the wheel again for the next student.
  • If a student cannot come up with an idea to continue the story, he’s eliminated.
  • Continue until there is only one student left. This student will be the winner if he manages to give the story in his group a suitable ending.

Here’s the wheel I have used with my students.

Join us on Facebook

Integrating Technology for Active Learning: An Activity Using Google Slides and Padlet.

There is no denying I use a lot of technology in my classes. It gives me great pleasure to discover a new tool and design an activity around it. I really think this is what keeps me motivated after so many years teaching. The challenge that mastering a tool brings and the possibility to use it in my classes to boost students’ motivation and spark their interest is certainly something that keeps my own motivation alive and kicking

Today, I would like to share with you an activity that I did with my intermediate students. I loved designing the activity and the way my students got involved activating their communicative and writing skills during the whole process.

Tools used:

Aims:

  • to develop students’ communicative skills
  • to develop students’ writing skills
  • to revise vocabulary related to “work”
  • to integrate technology in the classroom
  • to encourage collaborative work

Before the class.

I created a Google presentation using Google Slides and wrote the content for the first two slides. I also added three extra blank slides (see below)

I created three Padlets and called them: Work 1, Work 2, and Work 3

In each of these 3 blank slides I inserted a link to one of these Padlets.


During the class.

 One. I asked students to form groups of 4. I have 12 students in this class, so I had three groups, one for each blank slide. If you have more students, you can easily add another slide to accommodate two more questions. I asked each group to write three or four questions related to “work”. I certainly encouraged them to come up with some juicy questions and avoid simple ones such as “Where do you work?”

Two. Once they have written their questions, the groups read them aloud and the class decides on the best two from each group to keep.

Three. At this point, there are two things you can do

  1. Assign each group one of the three slides and ask them to write their two questions, being careful not to delete the link to Padlet. Share the link for your Google Drive presentation making sure you share the link with editing permissions (read and write).  I have shortened the link using Google shortener.
  1. If you think this step might be complicated for your students, you can always write them yourself. Have the groups dictate their two questions and move on to the next stage.

Four: Speaking. Ask students in their groups to discuss the questions in the three slides encouraging them to use work-related vocabulary. Get feedback.

Five: Set homework.

Show the presentation from the very beginning where they will see the instructions for their homework.

Explain that at home they will need to answer one of the two questions in each slide. They can do it by writing their answers or by recording them.

Remind them it is the same shortened link you shared with them in Three.

See one of the Padlet below


Hecho con Padlet

Lesson Plan: Do you Speak English?

This lesson is aimed at students with a language level of B1  (intermediate) and focuses on revising, learning and using vocabulary related to learning languages through a variety of engaging activities.

In this lesson students will get listening and speaking practice, learn new vocabulary, and have the opportunity to improve their writing skills.

Topic: Learning languages

Level:  Intermediate and above

Time:  60/90 minutes

Materials: PDF vocabulary, teacher’s notes

Online tools used: Spark adobe and Playbuzz


Warm up:

Guessing the topic.This funny sketch below works like magic to introduce the topic. The idea is to play this short funny video (2:48) and let students guess what we will be talking about.

Now, ask students to discuss these 2 questions:

  1. What’s the most spoken language in the world?
  2. What’s the most widely spoken language in the world?

Revising, introducing and using vocabulary

The idea is to elicit vocabulary by posing some questions and showing some pictures meant to stimulate spontaneous speech and class discussion. New vocabulary will be written on the board. See PDF with targeted vocabulary here

Tell students that of a total of 1, 5 billion speakers only 375 million are native speakers, so this means that over 1 billion people speak English as a second language. Ask them:

  • How do you think your country ranks in terms of English language proficiency?

Show them the picture below. If their country is not there, click here to see how it ranks. Elicit any reactions to the picture.

  • Does the ranking surprise them? Why (not)?

Get students in pairs to discuss the question below:

  • What do you find most difficult about learning English? Why do you think is that?


Listening and Speaking

Part 2. Listening Comprehension. Note taking exercise.

Alex Rawlings, who speaks 11 languages, says that the way to start speaking a language more fluently and more proficiently is to practise speaking. In the video, he gives us four tips to get more practice speaking the language we’re learning.

      1. Get a conversation partner
      2. Talk to yourself.
      3. Learn vocabulary in phrases
      4. Imagine how you’ll use the language.

Watch the video and summarise what he says about each of these tips.

Part 2. Speaking. Reasons for learning a foreign language.

After watching the video, in groups of 3 share the reason why you’re learning English

Answer the following questions

      • Do you know anybody who has emigrated from your country?
      • Do you know any immigrants? Can they speak your language?
      • Before entering your country, should immigrants be required to speak the local language?

Speaking

Do you Speak English?


Writing

Write an article on one of the following:

  • “If you are not willing to learn, no one can help you. If you are determined to learn, no one can stop you.” Zig Ziglar
  • “There is no elevator to success; you have to take the stairs”.Zig Ziglar

Post on how to write an article here

Don’t miss any posts and follow us on facebook